Below you can find a full guide in written format. Do you want to skip to the section most important to you? Click on the section below:
1. What is the difference between 'Product' and 'Category'
1.1. What is a 'Product'?
To put it simply, your products are the things or services that your venue offers and that you sell online. Products are an integral part of your online ticket shop as they conform to your online offering.
Therefore, if you don't create products in your Control Panel you won't have anything to sell on your Convious ticket shop, which is why it's so important that you understand how to create, edit, and manage them properly. So in this article, we have compiled everything you need to know regarding products, from how and where to set them up on your Control Panel to dealing with their management and updates.
1.2. What is a 'Category'?
You have to think of Product Categories as folders that contain products inside of them. So Product Lists or Categories are simply lists of products that belong to the same category grouped under one same "folder".
E.g: You can have two different product categories: One for Dated Tickets (containing day passes) and another one for Undated tickets (containing season passes).
1.3. Where do I find them in my Control Panel?
Firstly, log into your Convious Control Panel.
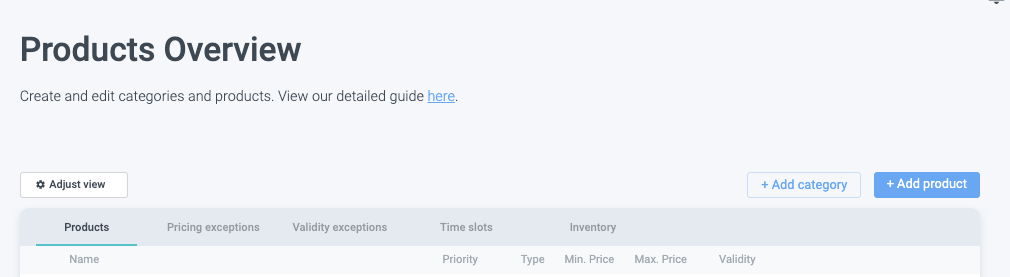
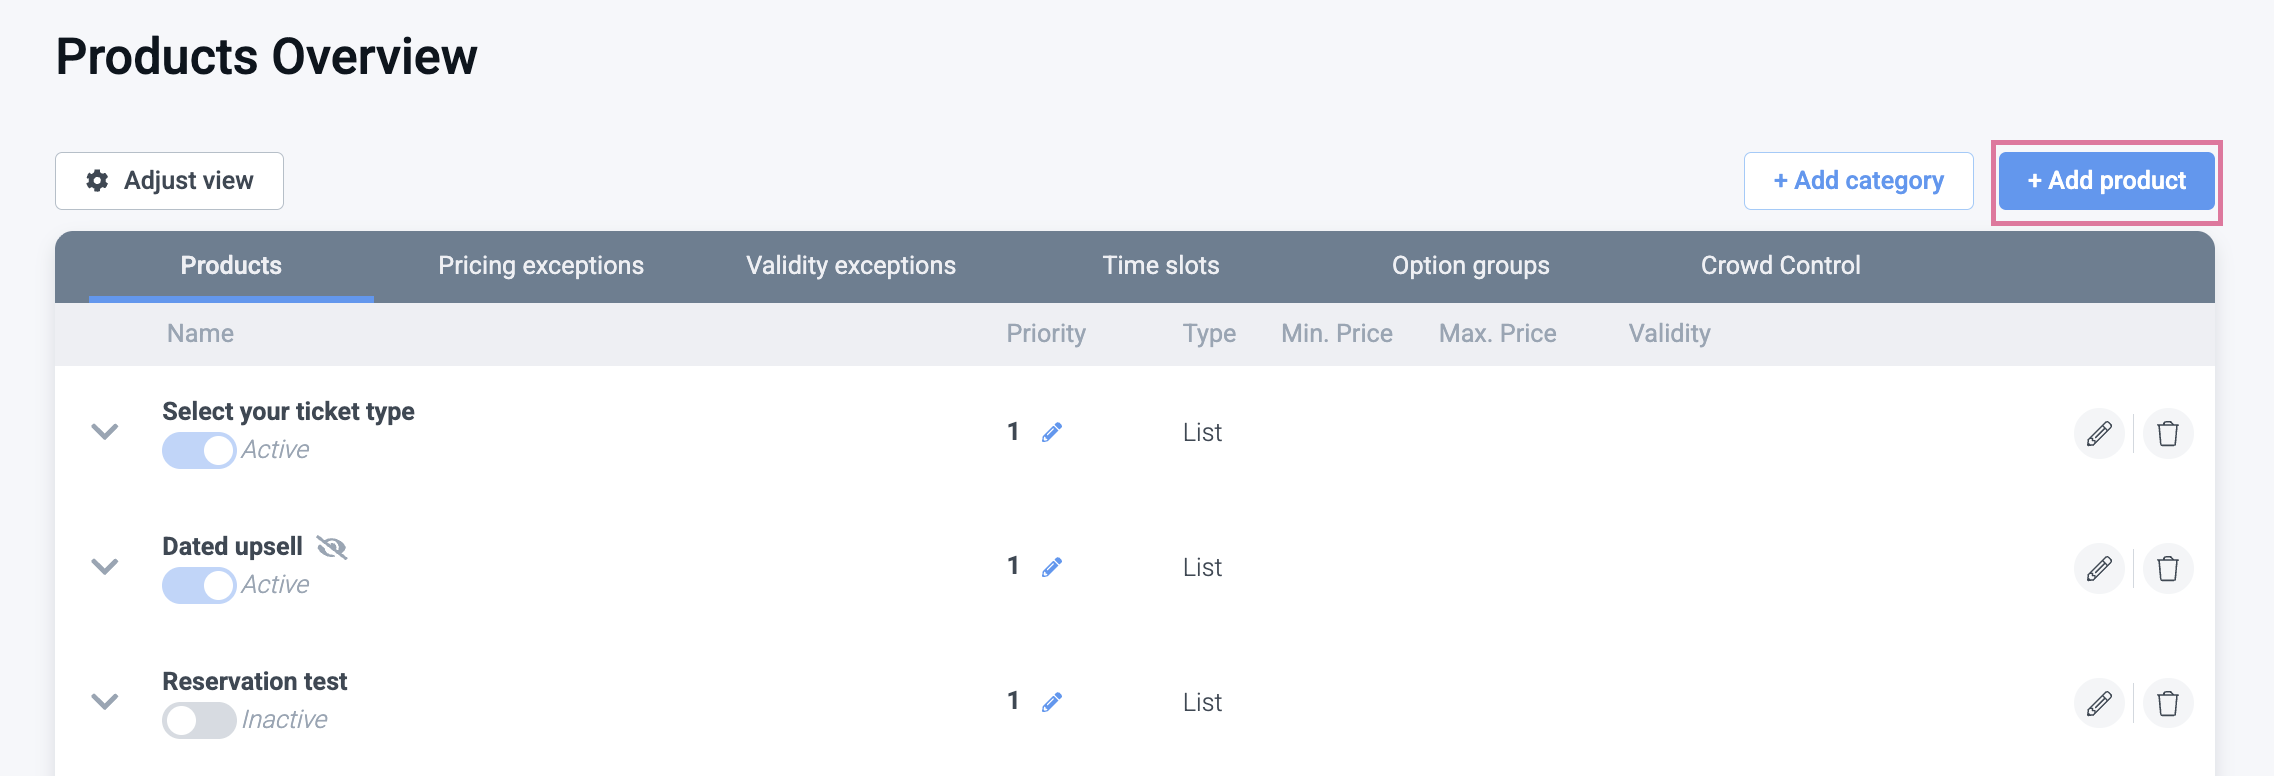
You will find all your products and categories (if you already have any) under the 'Products' tab within your left-side menu.
By clicking on it, you will be directed to the screen shown below. If you still haven't created any products, naturally, this screen will be empty for you. If you already have some in place, then it will look something like this Product Overview screen:
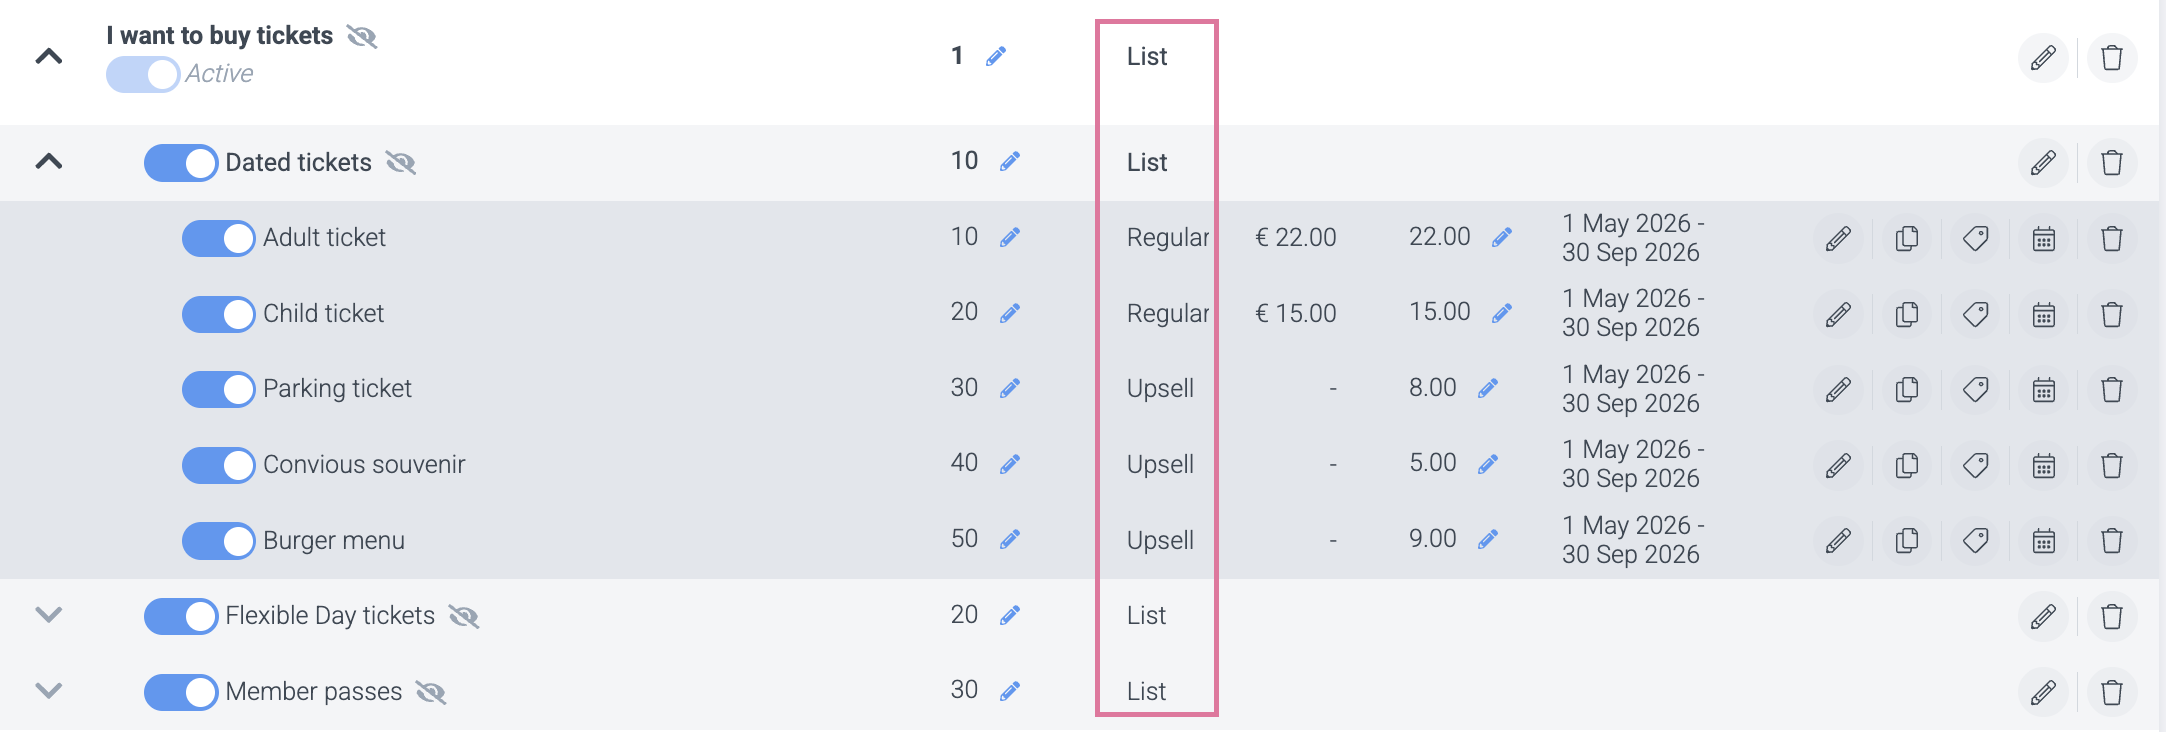
In this example, 'I want to buy tickets' is a category that contains different child categories:
1. Dated Tickets
3. Flexible day tickets
4. Member passes
The first, Date Tickets, holds 5 different products:
(a) Adult ticket
(b) Child Ticket
(c) Parking Ticket
(d) Souvenir ticket
(e) Burger Menu
How can you recognize categories (product lists)?
They are labeled as 'List' under the 'Type' column
They will have an arrow icon on their left-side which you can use to unfold (show) or fold (hide) products within the category.
How can you recognize products?
In case you already have categories created, the products within them will be lined up below the category title, starting their row slightly to the right. Products will show their different pricing types under the 'Type' column (e.g: Regular, Upsell, Payment Plan) and will show pricing and validity settings in the following columns as well.
2. Navigating on your Products Page
First off, it is important to know you can adjust the view of your products page.
1. You can find your products page by going to Products under Configuration within the main menu on your left-hand side
2. Now, click on Adjust view
You can choose between viewing by Categories or Products. Depending on what you want to edit or view, different views might be handy.
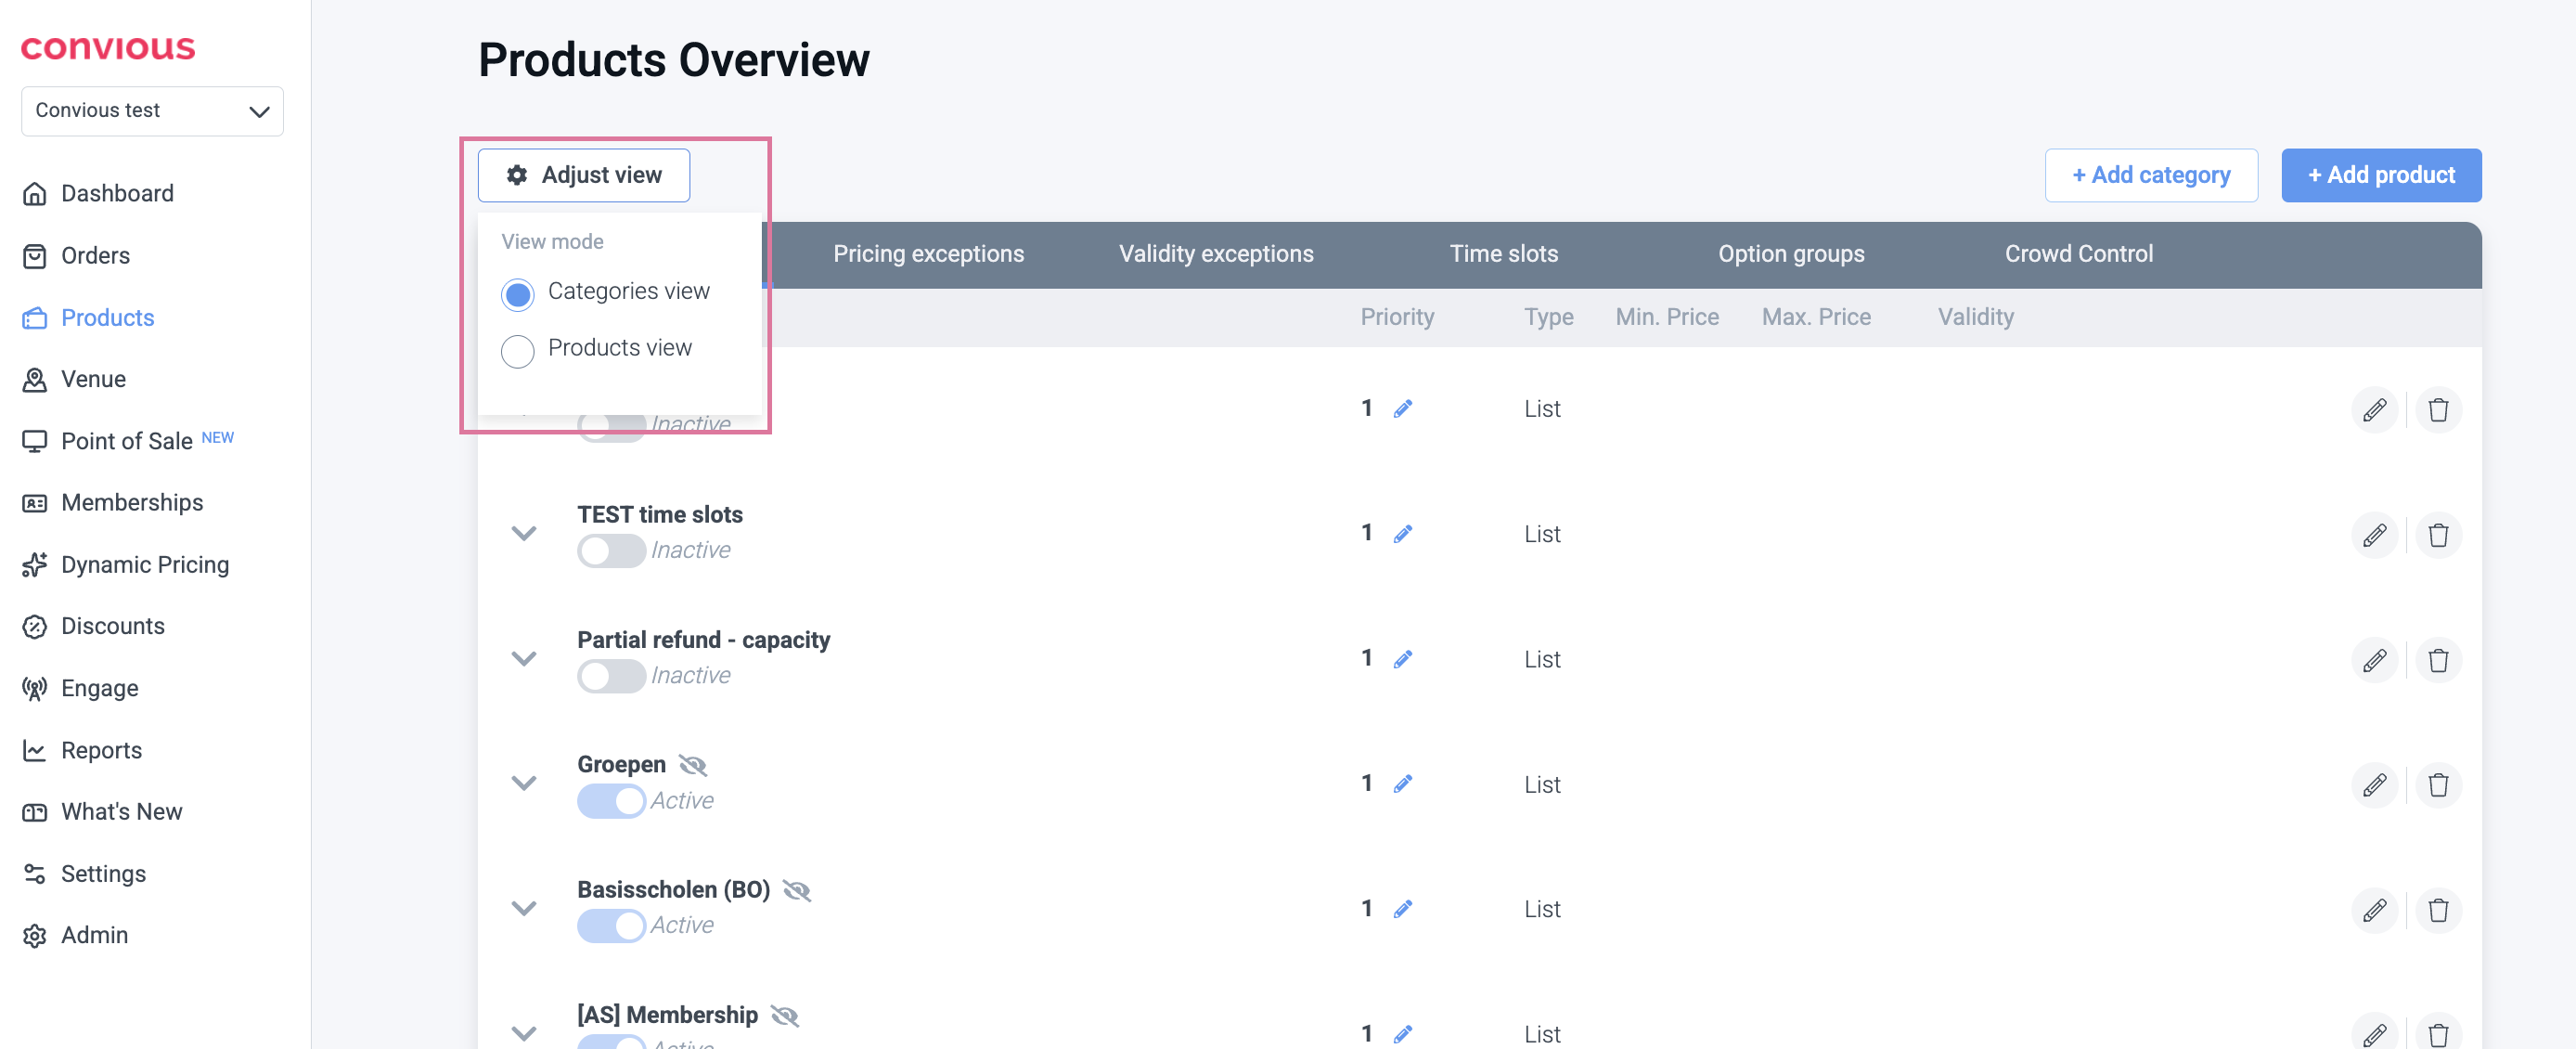
For example, if you want to see which products you have already created for your new special, you enter the product view. But if you want to double-check whether your category is arranged right and has the right products connected, it might be handy to check from a category view.
If you select the product view, you can filter your products further by pricing types. In the product view, you can also search for a specific product — either by product name or by product ID — using the search bar available in this view.
Per category, you will see the articles attached to it.
Next to the Priority, Type, Min. Price, Max. Price and validity, you also have 4 little icons on the product level that allow you to take quick action.
Let us explain them to you one by one - from left to right:
1. The pencil will let you edit the product.
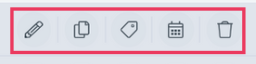
2. The page icon will let you duplicate the product (see ⚠️ for details).
3. The price tag icon will take you to the pricing settings of the product.
4. The calendar will take you to the validity settings of the product.
5. The trash icon will delete the product.
Pro Tip: If you use the Chrome browser, you can do a left-click and open the page in a new tab. This can be useful when working on products while wanting to go view the overview or other products at the same time.
⚠️ When duplicating a product, be aware that it will
Have the
Copy ofprefixed to it’s nameBe not active
Have all possible relations and copies linked and duplicated such as categories, validity overrides, translations, bundle items, time slot groups, pricing settings, etc.
Relations that are not duplicated:External ids
Bundles: If the product was part of a bundle, then the copy won't be.
3. How to create a new category
Creating a new category is a piece of cake and you can do it in just a few clicks! Here's how:
STEP 1
Go to the 'Products' section on your left-side menu in Control Panel where you can find a list of all categories (if any) - as shown in the example below:
STEP 2
Click on the button 'Add category' which is highlighted in yellow above. You will then be directed to a screen like this that contains multiple empty fields and toggles:
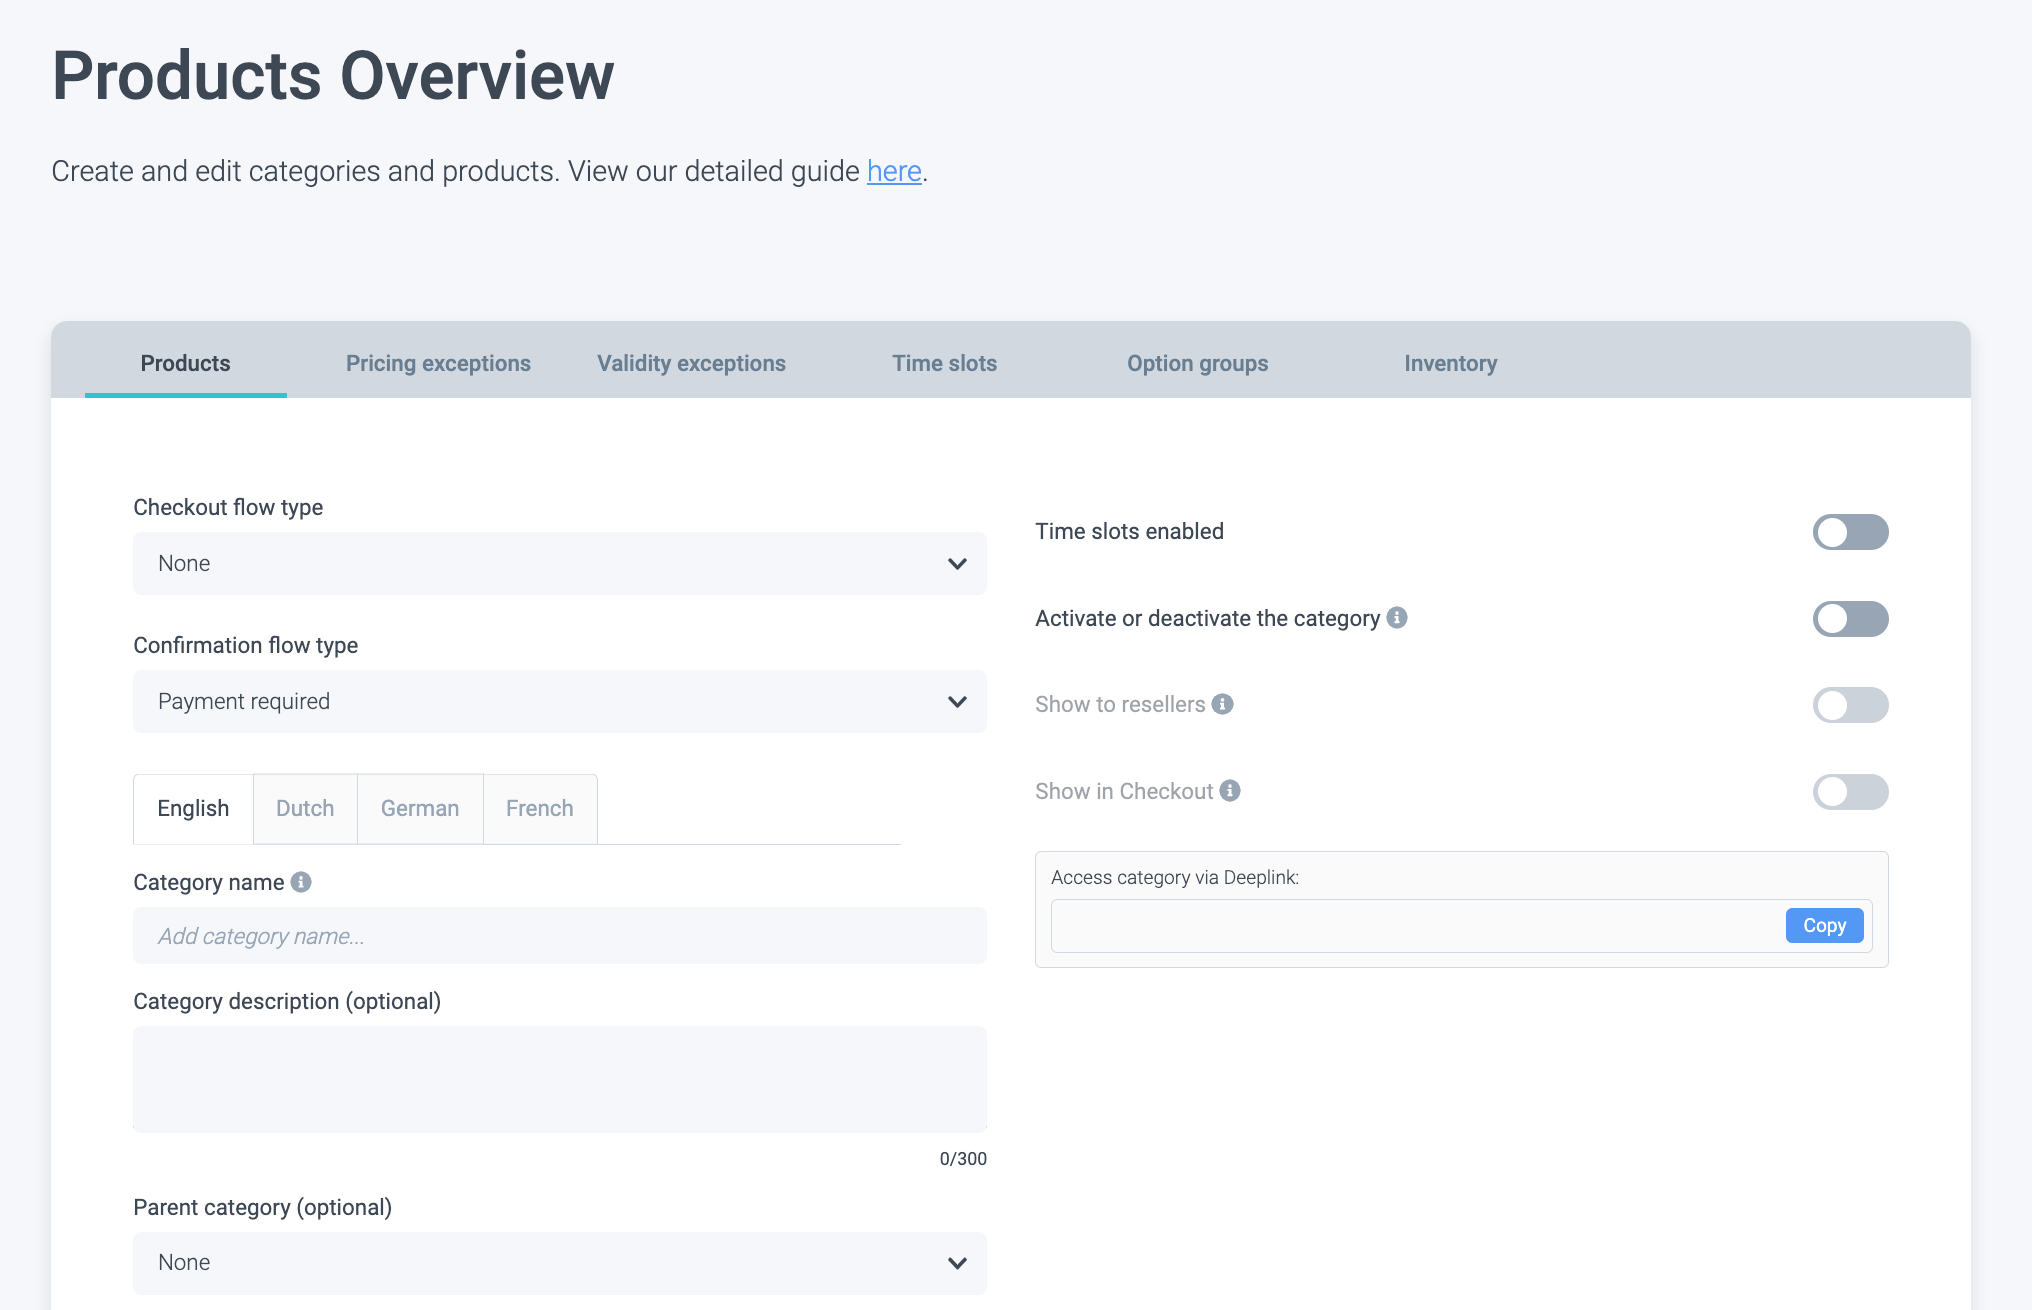
STEP 3
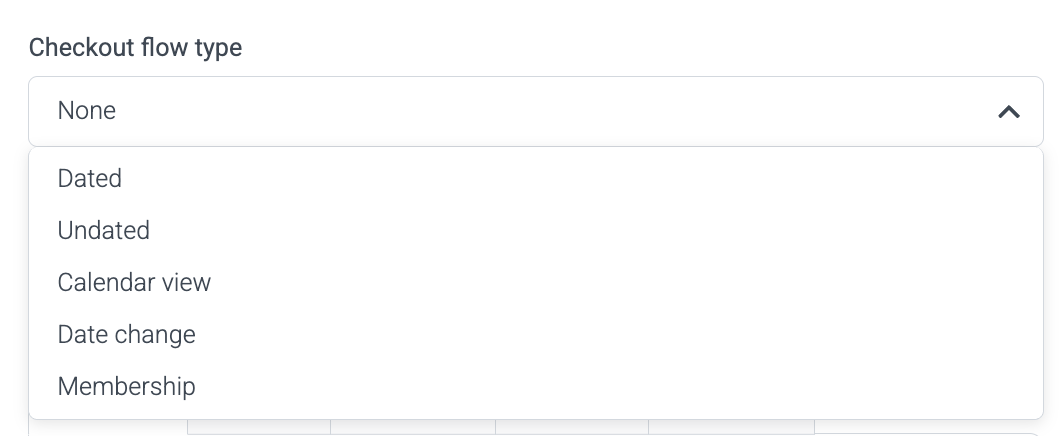
Let's get started - select the Checkout flow type.
Dated is for dated ticket flows such as single- or multi-entry tickets for specific days.
Undated for undated ticket flows including flexible day-tickets, member passes or season passes
Calendar view is for flows including products that have Real-Time pricing.
Date change is for flows where customers are changing the date of an existing booking.
Memberships is for membership-based ticket flows.
Now, select the Confirmation flow type.
Payment required flow is for the flows where the customers will need to pay, for example, "Dated tickets".
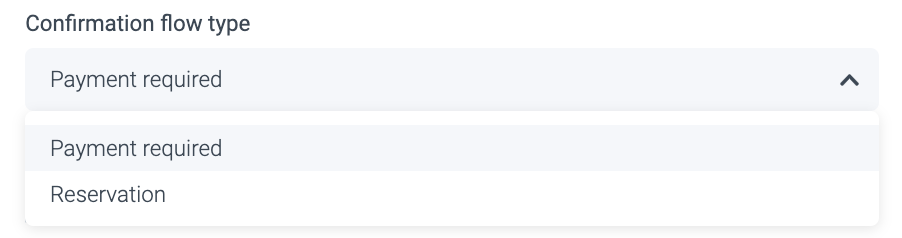
Reservation is used when the customers don't have to pay, for example, for "I already have a ticket" flow. In this case the validation for reservation code will be activated.
STEP 4
Fill in the fields.
Language: Select the language for which you want to edit your category. If you have multiple languages (e.g: English, German, Dutch) then you will have to fill in the text fields as many times as languages you have. Just click on the arrow to swap between languages and add all of your translations.
Name (Required field): The name you type in here will be the name that will appear on your Convious ticket shop.
Description (Optional field): This field is meant to be used to add additional information regarding the product category in those cases where an explanation is needed.
See the example below to get an idea of how these fields will look like:
Parent Category:
When creating categories, you can have two types of arrangements.
a) Parent: Categories (lists) which contain another category/categories inside of them.
b) Child: Categories which directly contain products/articles inside of them.
Let's see an example below:
Parent Category 1 (e.g: Season Passes)
Child Category 1.1 (e.g: Regular Season Passes)
* Products
Child Category 1.2 (e.g: Family Season Passes)
* Products
In this case, Category 1 (Season Passes) is the parent of another two categories (Category 1.1 and Category 1.2). We call this a parent category: A category that is hosting another category or categories within itself. If what you are setting up is a parent category, you should set this 'Parent Category' field to 'none', because a parent category doesn't have any parents above it.
On the other hand however, if we look at Category 1.1 or Category 1.2 these are not hosting more lists within them, they are simply hosting products. This is what we call a child category. Child categories are hosted by Parent categories above them. In this case, if you were creating a category inside another category (e.g; Category 1.1 - Regular Season Passes) you would have to indicate which category it is part of (e.g: Season Passes), by selecting its parent. You will be able to do so by clicking on the 'Parent Category' field from a drop-down menu.
Category Priority: When you have created multiple categories, you can use this field to define in which order you want to show them in the ticket shop.
Setting a Booking Horizon & Release time:
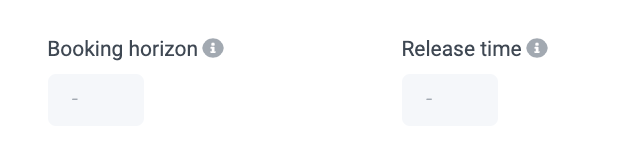
A booking horizon defines the number of days from today the category or product within will be available in the ticket shop. This may come in handy if you want to prevent customers from booking too far in advance. Please note that the number of days you can book always includes the visit day.
For example, suppose you set the booking horizon to 7 days and sell tickets for a special event on July 4. In that case, your category will be available on June 28. but not be available earlier = 6 full days before the visit/event date + the date itself.
The release time defines the number of days from today the product will not be available to buy in the ticket shop. You can use this to set up a category or product that you want to make available for purchase in the future. It is important to know here that today (the day you are setting it) counts as one of those days.
For example, if you set the release date to 2 days and today is July 1, your category will release (go live) and be available to your customers in 2 days (July 3.).
If you want neither of these settings enabled, you can leave it blank to disable it.
Square images or wide images?
Category Images: You have the option to upload an image to make your category card more attractive or to showcase the category of products you are offering in a more visual way.
With products and categories, by default, you will have rectangle or wide images in your ticket shop enabled (450x140), but we also offer the option to use square images instead.
Why we recommend choosing square images:
For one simple but powerful reason: It reduces scroll time. Less scroll time means your potential customers can view all your offers at first sight!
How to upload square images:
It's easy! Here is what you have to do:
1. Send a message to support@convious.com and let us know you want to have square messages enabled - we will take care of the activation.
2. MEANWHILE you get back to your categories and products to upload images with the dimensions 300x300. Make sure you use the correct measurements because the resizing of your image will reduce its quality immensely!
Please note NOT to remove your wide images just yet. Your square images will only show once we have activated them for you, and if you remove your wide images already, you will have no images until then. But don't you worry: if your square images are uploaded, and we activate them for you, they will display instantly after activation hiding your wide images - no need to delete them.

Lastly, it is crucial to point out that square images do not work for products that hold product options.
STEP 5
Enable the right toggles:
Time slots enabled: If this toggle is to the left, your configured times slots do not apply to this category. If the toggle is to the right, you enable the time slots to apply to your category. Read more about configuring default and specific time slots here.
Activate or deactivate category: You can activate (take live) or deactivate (hide) categories just by clicking on the toggle button. This is crucial to make your category visible to the public.
Included for resellers: Here you choose whether or not this category will be visible for your resellers (if you do not have any, this will not be relevant to you). If this toggle is to the left, your category is not visible (= not bookable) for your reseller. If the toggle is to the right, it is visible and thus, bookable for your reseller.
Show in Checkout: If this toggle is to the left, the active category will only be accessible via a Deeplink provided to you. As a matter of fact, this toggle needs to be to the right in order to show your category in your ticket shop.
⚠️ You will need to have your category activated AND enabled to show in the Checkout to be visible to the public. ⚠️ It is not enough to have only one of the two enabled!
STEP 6
Hit 'SAVE' on the bottom right corner and you are done!
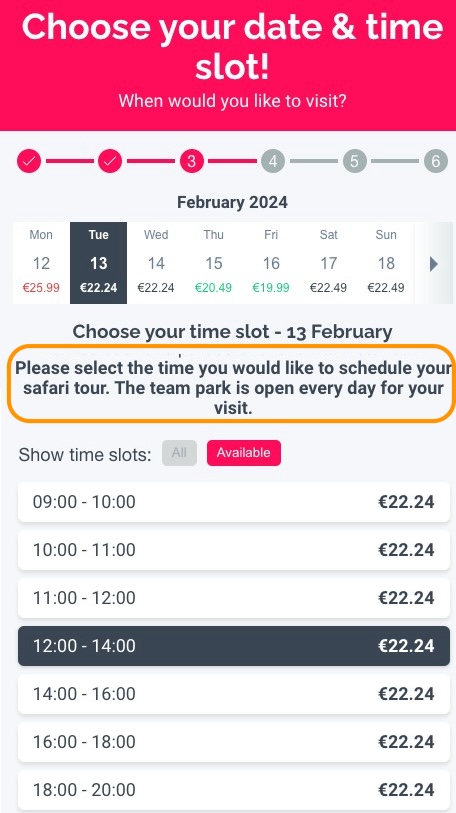
Category time slot description
We provide the option to include explanations of what each time slot entails or to offer brief descriptions. For example, consider a partner offering access to both a Team Park and Safari Tour. While your ticket grants admission to both attractions, you'll need to select a specific time slot for your Safari Tour. However, you're free to enjoy the Team Park throughout the day. Please note that this feature is optional.
To set up time slot information, follow these steps:
Navigate to the corresponding category where you'd like to add the information.
Ensure that time slots are enabled for that category.
Once enabled, you'll find an additional input field labelled "Category description (optional)." Here, you can input the information you'd like customers to see.
Please keep in mind that you have a limit of 500 characters for the description. Remember, less is more, and more is less. Using fewer characters can lead to higher conversion rates. In fact, in approximately 99% of cases, detailed descriptions aren't necessary and may even reduce conversion rates.
4. How to create a new product
STEP 1
Go to the 'Products' section on your left-side menu in Control Panel where you can find a list of all products (if any) - as shown in the example below:
STEP 2
Click on the 'Add product' button which is highlighted in yellow above. You will then be redirected to a screen like this that contains the following fields:

2.1 Product category:
Here you need connect the product to one or multiple categories that it belongs to.
Simply click Edit, and choose the right parent or cild category from the selection and hit Apply.
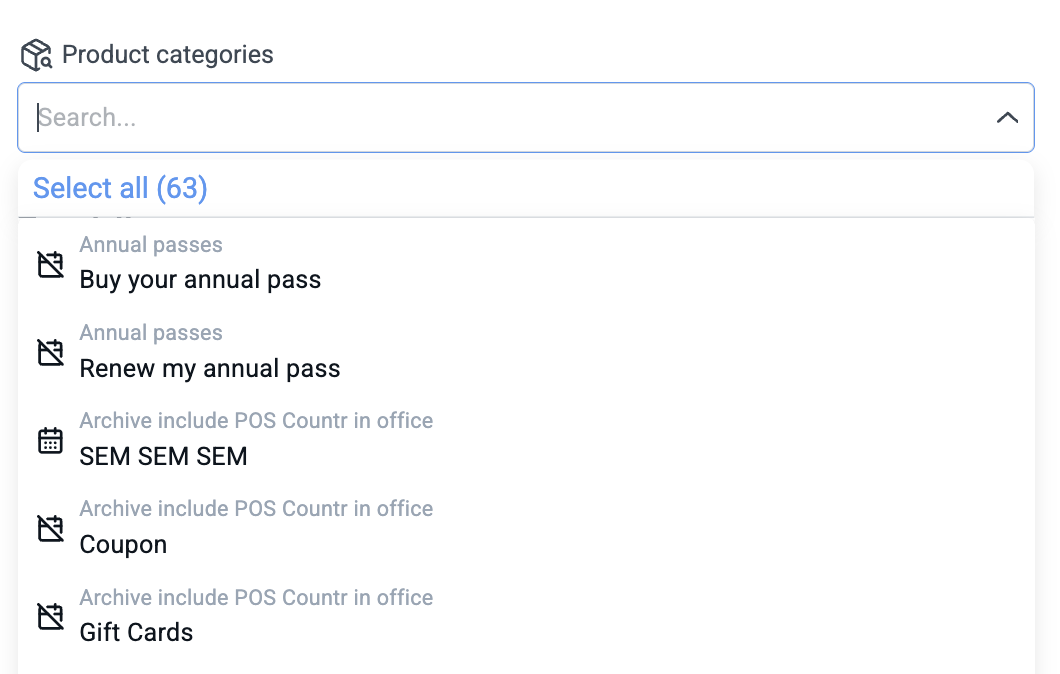
As soon as you hit Apply, you will see the number of categories a product is connected. Here, we connected it to one category:

Connecting Products with Categories and vice-versa is done from a 'Product' level, not from a 'Category' level. If you want a product to be inside a specific product category, make sure you have created such category beforehand (you can follow the steps mentioned above on how to create a new category).
⚠️ TO KEEP IN MIND: Make sure to enable the categories (active and live to the public). If the products are not assigned to them, then they will simply not be shown in the Checkout because they have no parents to 'host' them.
2.2 Translations: Under translations, you will see as many tabs as languages you have enabled for your ticket shop. Remember to fill in the settings and translations for all your languages.
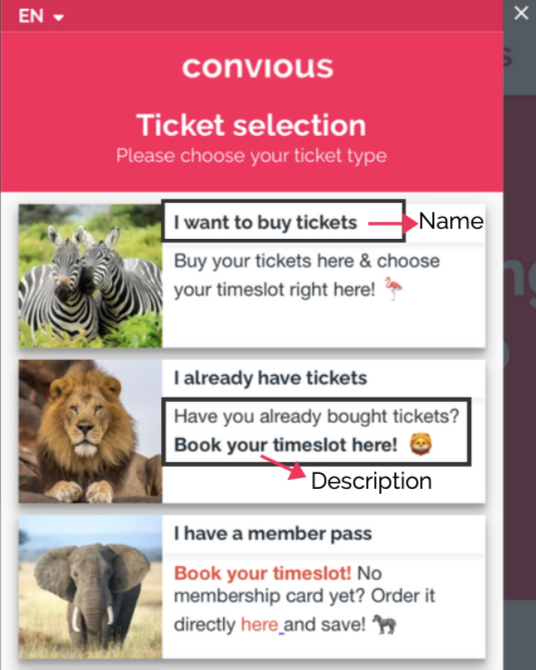
2.3 Product name: Required. This is the name of your product that your customers will see in your ticket shop.
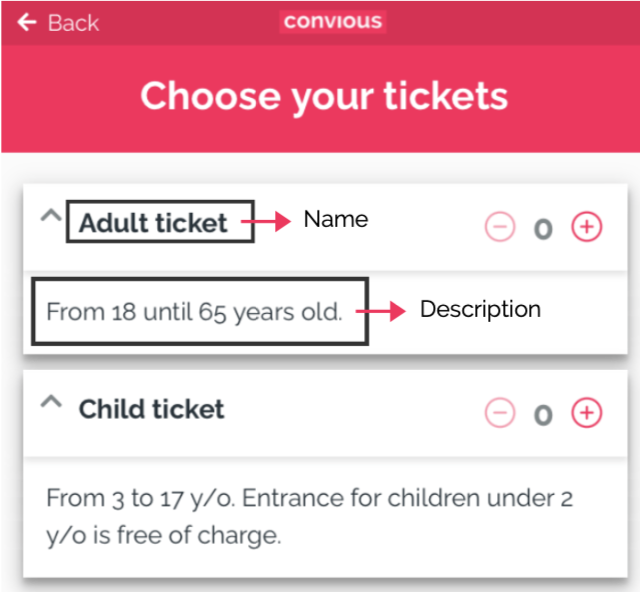
2.4 Product description: Optional, maximum of 300 characters. Here you can choose to add additional information regarding your product (things like the required minimum age, if they need to bring their ID with them, terms and conditions, necessary clothing or equipment, additional requirements etc. Basically, anything else you want to say about your product!).
As you edit these fields, you will be able to see a preview of what you are building on the right-hand side of the screen. On top of that, however, here's an image to help you get an idea of where are these fields displayed on a real-life ticket shop:
2.5 Product type
When you click on Product type you will see a menu expand. Here you will choose the purpose your article has.
Single ticket: Single visit ticket - can be used for dated and undated tickets.
Reservation: A ticket that will be issued as part of a reservation flow.
Upsell: This will be upgrades and add-ons to the main products that can be purchased just before completing the payment/reservation products.
Season/Yearly ticket: This will be your season passes.
Membership: For membership-based products.
Multi-visit ticket: This includes those tickets you might offer that can be used to book multiple visit dates (2-day tickets, etc.).
Bundle (Package or Group booking): For bundled or group products.
Voucher (Gift vouchers, Coupons or Discounts): For discount or gift voucher products.
Date change: Choose this type for the products that are used to change the date with the self-service reservation changer
Service (Cancellation, other)
Service fee
Donation: Choose this to implement a donation flow into your ticket shop.
Loyalty card: Depending on your set-up this type integrates your loyalty cards.
Food and beverage

If you scroll down on the product page creation page you will see:
2.6 Product pricing type: In this field you will need to choose what type of pricing your product will have. You can choose between:
Regular
Upsell
⚠️ TO KEEP IN MIND:
Once you select the product's pricing type and save your changes you won't be able to change its pricing type again. If you would like to do so after you have already saved the product you'll have to create a new one from scratch, re-fill all fields and then change the pricing type, so if you want to avoid this, make sure you save your products' pricing type mindfully.
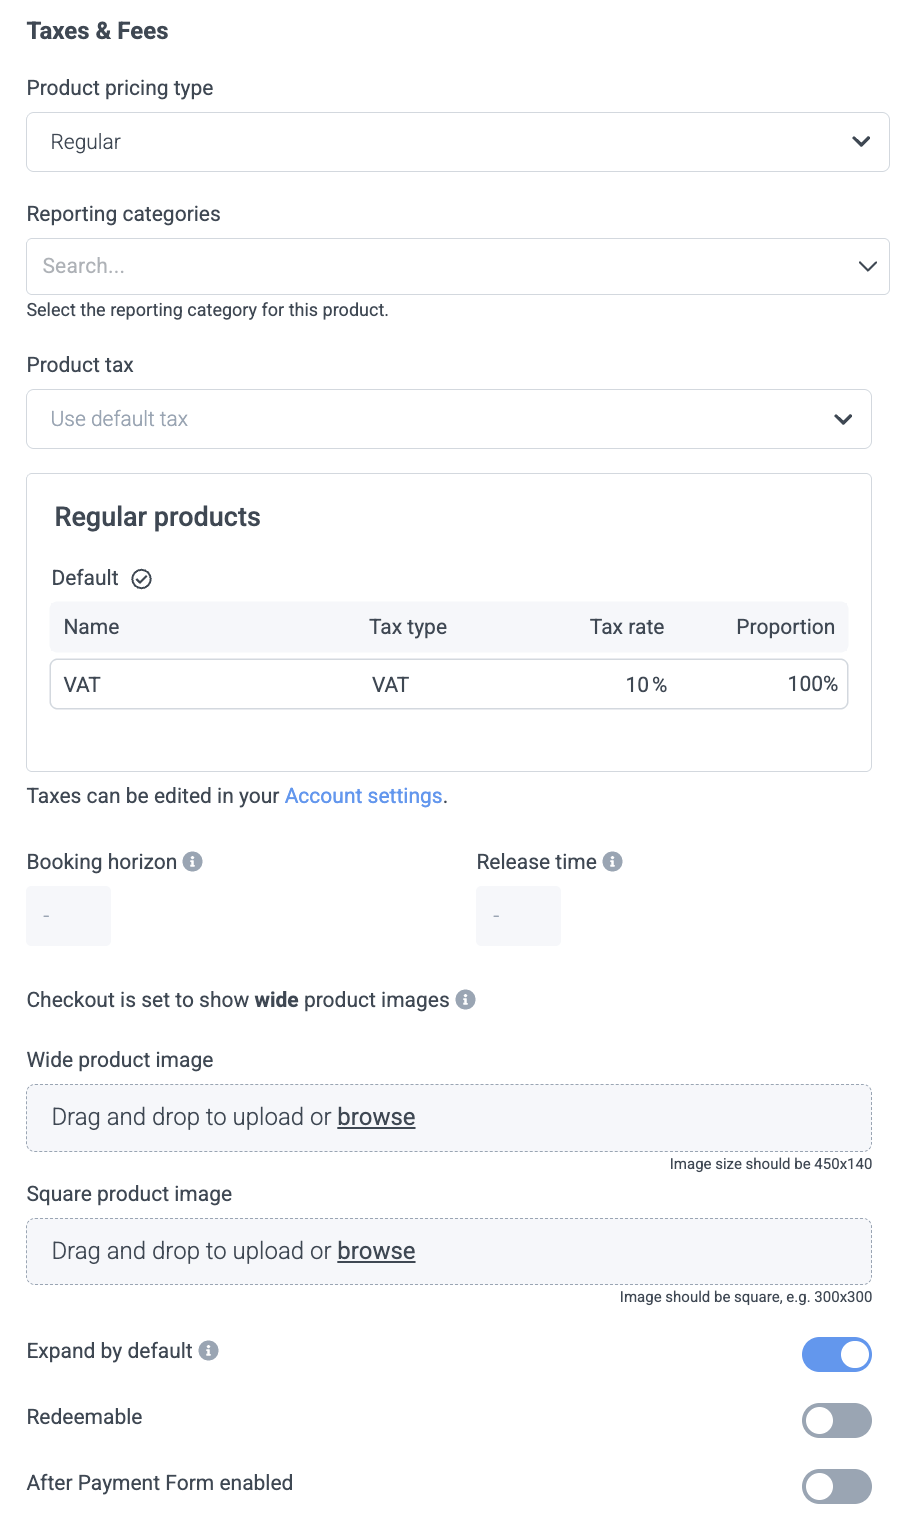
2.7 Reporting Categories allow you to assign a code and label to your products for financial reporting and accounting purposes, grouping them so your finance team can analyse revenue, taxes, and discounts by category rather than by individual product. You can set them up under Settings → Account → Reporting Categories and, once assigned, the category name and code will appear in your Sales Detailed report at the time of purchase.
2.8 Product priority: When you have created multiple products, you can use this field to define in which order you want to show them in the ticket shop.
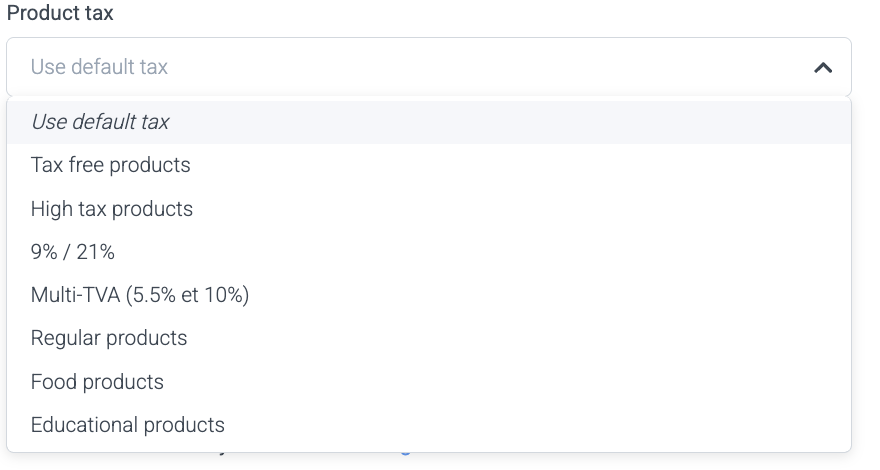
2.9 Product tax
According to your taxation you have communicated to us, VAT will be globally set on your account for all articles that is the Default tax. This dropdown menu however, provides you with the chance to select another tax type that you have configured in your account for this product only.
To learn how to set up tax configurations in Control Panel, click here.
To see a full guide on setting your VAT% please click here.
2.10 Booking Horizon & Release time
For more details on this topic, please see Step 4 in Chapter 3: How to create a new category
2.11 Product image:
For more details on this topic, please see Step 4 in Chapter 3: How to create a new category
2.12 Show image by default
This only applies if you uploaded wide images! If the image does not show by default, the image will only show once the category/product is chosen by clicking on it. If it is enabled to show by default, the image will show without needing the click.
2.13 Redeemable
If you toggle to the right, this means you will be able to scan the barcodes of these products, and they will appear as redeemed in your Order List view in your Convious Control Panel.
2.14 After Payment Form
Collecting your visitors' information is not only providing you with the contact details needed to keep them engaged or to issue a season or member pass; it is also a safety necessity to know who comes when to your venue's doors. With Convious, you are using an After Payment Form to collect this information.
Enabling APFs works both ways: From the APF editor and product level.
If the toggle is switched to the right to enable the After Payment Form is enabled.
BE AWARE: You also need to assign the right APF fields to this specific product for the APF to show. This can only be done from the APF editor. But no need to worry - it is easy! You can find all information on how to edit your APFs here.
2.15 Tickets per customer The default values are 1 as the minimum and 10 as the default maximum. While you always have to have at least 1 or higher as the minimum, you can edit the maximum to your preference
2.16 External ID:
For those partners to whom it is applicable, you will see an additional field to enter your external IDs which are the corresponding product IDs used for integrations. If you have multiple IDs please separate them by pipes: |
2.17 eTickets & season pass print version
Next, you will have to connect the right eTicket to your product. If you still need to create an eTicket, go to to our eTicket article to learn how.
If you or one of our experts has created an eTicket template for you, it will show up in the drop down menu. Select the right template to connect it.

If you are creating a season pass, then you have the chance to add a printable version. Find all information on uploading a template here.
2.18 Barcodes, scan limit and ticket duration
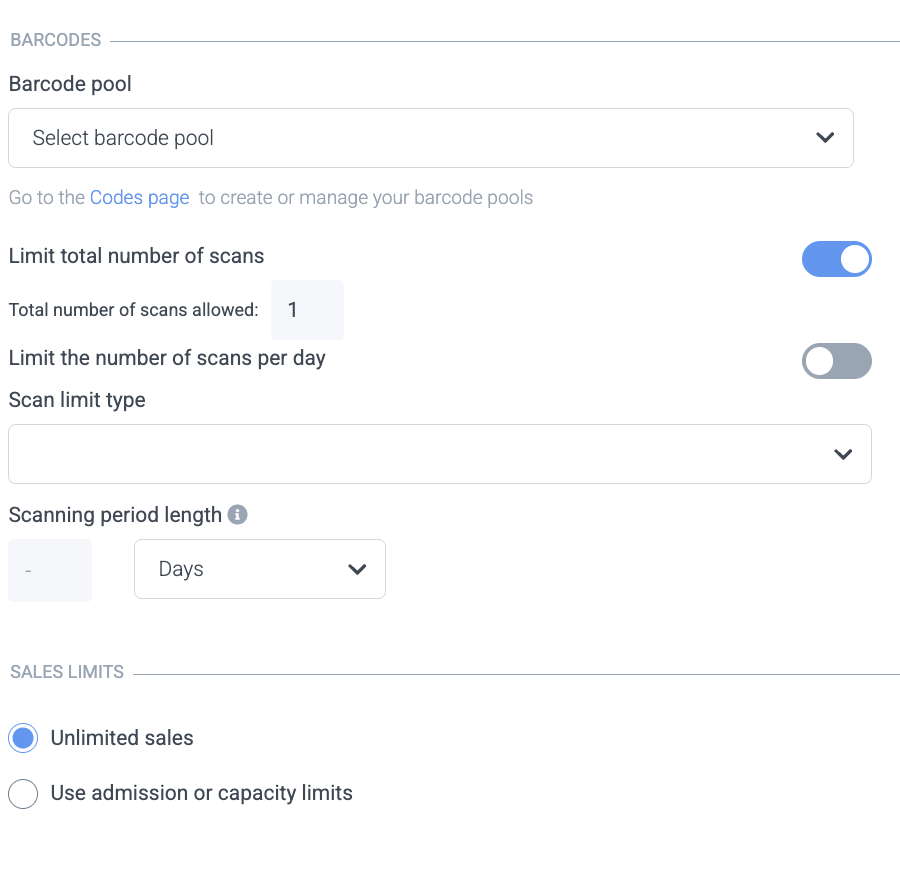
Barcode pool
If you want to add them to an already existing Barcode pool, it will appear in the drop-down menu. If you need to create a new Barcode pool for your new product, please give our Barcode article a read to make sure you have this set-up just right. Once your Barcode pool is created, it will also appear in the drop-down menu. Please note that this is a crucial step. If you do not connect the right Barcode pool to your products, your products will not be redeemable!
Scan limit
A scan limit defines the number of times a barcode can be scanned.
Allow scanning on period starting on purchase date: If you select this, the period the ticket is valid starts from the day the ticket was purchased.
Allow scanning on period that the product is valid: If you set this, the ticket will be valid for the time the validity period has been set
Allow scanning on period starting on 1st scan: If you set this, the period the ticket is valid starts from the first time it has been scanned.
Ticket duration
Ticket duration can be defined as X year, month, and days starting from the purchase date, or the ticket is scanned for the first time. It defines the time duration in which the ticket is scannable.
To bring this into context: If you set the scan limit to Allow scanning on period starting on 1st scan and the ticket duration for one year, the ticket will be scannable for an unlimited amount of times within a year from the first scan date.
Good to know
The scanning period settings are independent of the nr of scans allowed
You can set the total number of scans allowed. In our example, we selected 1. This can be set to 0 if you don't want the product barcode to be scannable. This is useful for products that should only be used as reservation codes and not be scanned.
2.19 Capacity
Connecting your product to the right capacity is another important step. Depending on your set-up, you need to connect your products to the right capacity to ensure that no overbooking will occur. If you only have an overall capacity, it obviously needs to be connected to that. If you have a set-up with gate capacity and your new product is a ticket, not an upsell, in most cases, than this is what you need to connect to it to.
STEP 3
Once you have filled in all of the fields mentioned on the previous steps, make sure you hit the "SAVE" button on the bottom right corner to save your changes.
If you want to publish the product after you set up pricing and validity, come back to the product settings and move the toggle at the top to the right
STEP 4
Hitting 'SAVE' on your new product's settings however, won't automatically put your product live in your ticket shop unless you have added pricing and validity settings to it.
Therefore, to make sure that your new product is shown on your Convious ticket shop you will first have to add pricing and validity to it.
You can do this by simply clicking on the tabs shown on the top of your Product Settings screens:

Check these related articles about pricing and validity settings if you need additional information on how to set it up:
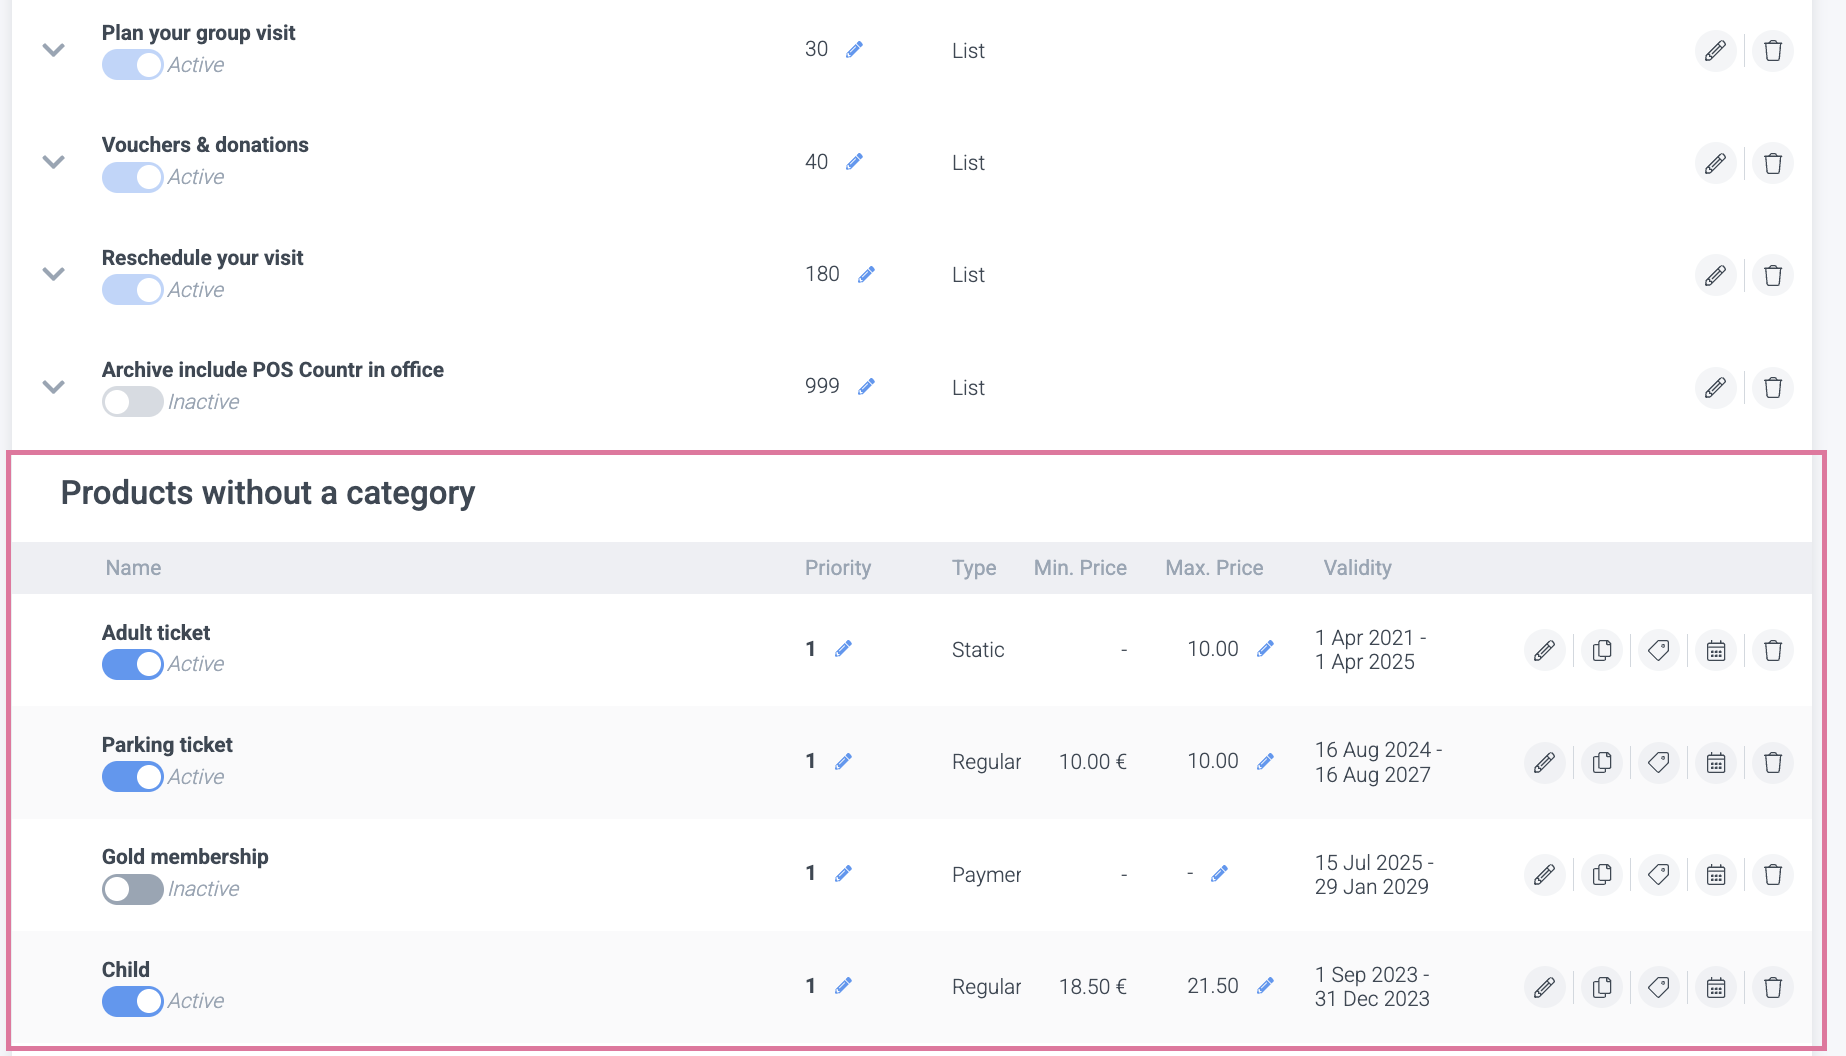
Products that have not been assigned to any category will be clearly shown under 'Products without a category' in your Product Overview screen
5. Editing an existing product or category
To edit details and settings of an already existing product or a category:
STEP 1
Go to the 'Products' section on your left-side menu in Control Panel where you can find a list of all products and categories (if any).
STEP 2
Click on the name of the product or category to see more details about it.
STEP 3
Click on the fields that you want to edit and insert your changes. Then remember to hit the "SAVE" button to save your changes.
If the product or category you are editing is active (toggle button is blue) then the changes you make will instantly be live on your ticket shop for everyone to see as soon as you hit the "SAVE" button.
And there you have it! We hope this step-by-step guide will be helpful in regard to managing and editing your own Products and Product categories!
For any requests or questions, please contact support@convious.com.