In times where guest flow needs to be controlled, setting up time slots is a necessity. It allows your visitors to spread upon arrival and, subsequently, in-venue.
Now you can not only set up general time slots that will be enabled for all categories, called the default time slot, but you can also set up time slots for a specific one or multiple categories/product lists that will then overrule the default setting.
In this guide, we will demonstrate the difference and how to set it up correctly:
Setting up a default Time slot for all categories
1. Navigate to Time slots in your Products section of your left-hand menu. Here you will be able to see all your previously configured time slots. On one view, you can see which categories they are connected to, what priority they have, what their weekly pattern is and to what date range they apply. We will explain each of these as we set up your time slot.
If you have time slots for products enabled because you purchased this add-on, you will see your time slots split by Categories & Products.
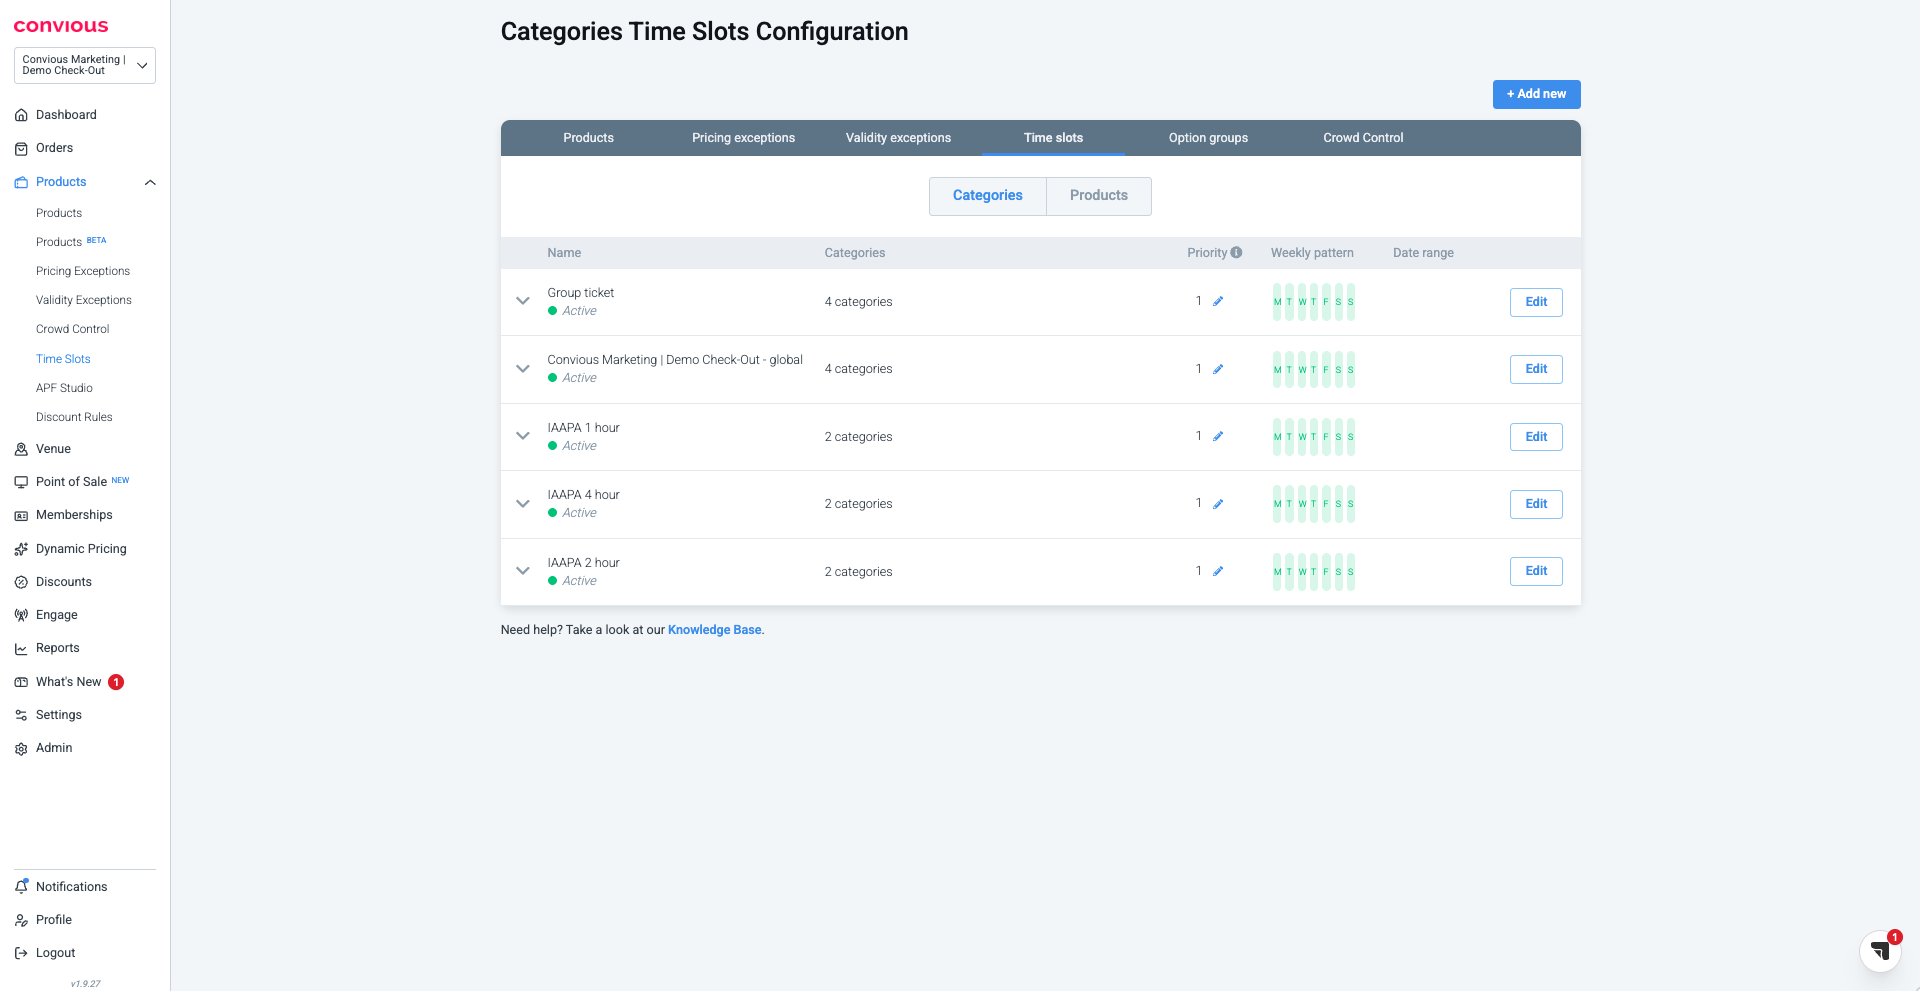
2. To add a new time slot, please click Add new.
3. First, you will need to choose a name for the Time slot. Choose something descriptive that is easy to understand. For this purpose, we will call it Default time slots March-April.
4. Then define a weekly pattern. By default, the entire week is selected. You can deselect the days by clicking on the icons.
Selected days, days the time slot applies to, are green and deselected days, days the time slot does not apply to, are red.
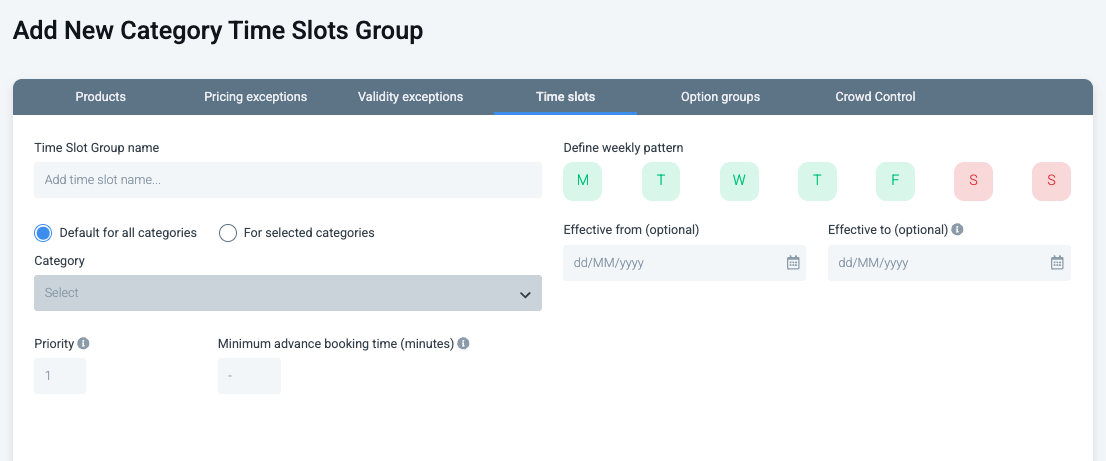
5. Next up, you will have to select Default for all categories to set up the default time slot that will count as your basic time slot rule. Therefore, there is no need to select categories.
6. Now, you need to define the dates this time slot will apply to. Please note that the date you choose effective from and effective to will be included, and thus, the time slot will apply to those days as well. In our example, we want the time slot to apply from March till the end of April:
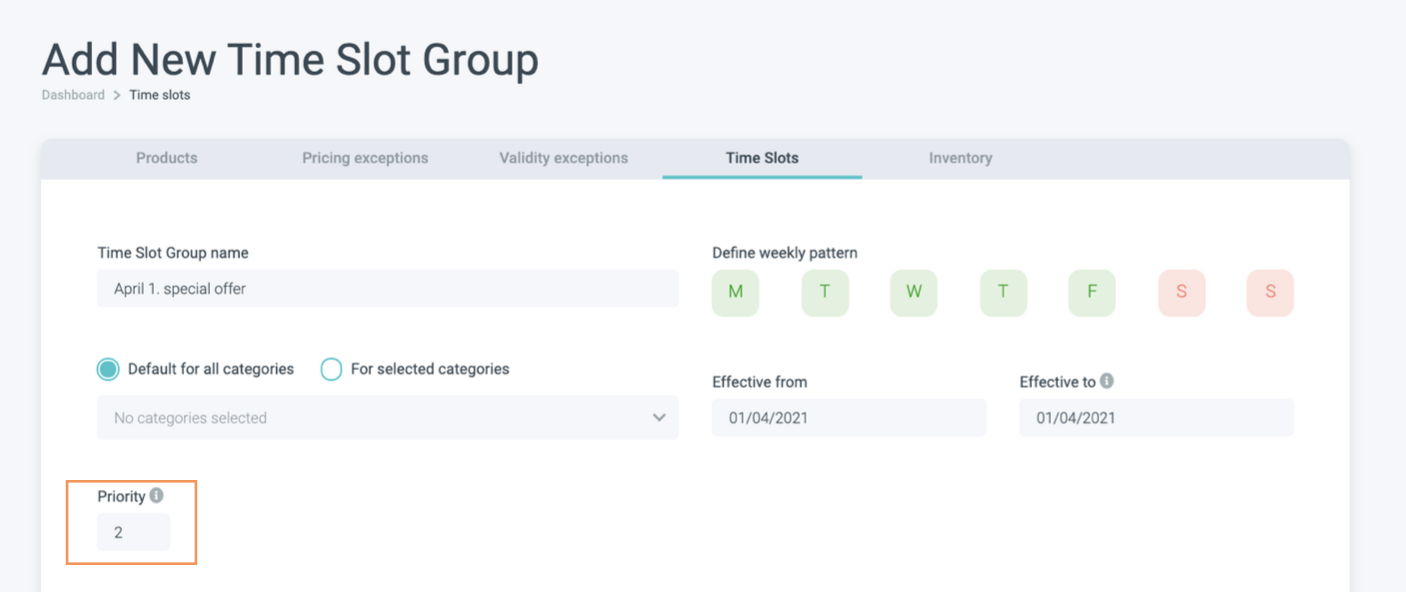
7. As it is your default time slot, you should set priority to 1. This will allow you to set higher priorities to override your default setting when configuring time slots for selected categories.
With time slots you need to remember: The Time Slot Group with the highest number will have the highest priority.
8. Next, you can set a Minimum advance booking time (minutes). The Minimum advance booking time (minutes) is the time in until which duration ahead of the starting time your time slots can be booked in advance.
To clarify with an example: If it is set to 5 min and the time slot is 12:45, customers can book it until 12:40 - up until 5 minutes before the time slot.
9. Time to manage and set up the actual time slots.
9.1. Tick Prefill end times to make the set up quicker, easier, and less error prone. If you tick this box and add a starting time, the end time will be automatically set according to the duration you have set up at the bottom
9.2. Use the time slot duration to make adding a new time slot quicker and ensure the same time slot duration for all your time slots.
If you set up a one hour duration, once you add a new time slot, this will be adding one hour to the end time of the previous time slot:
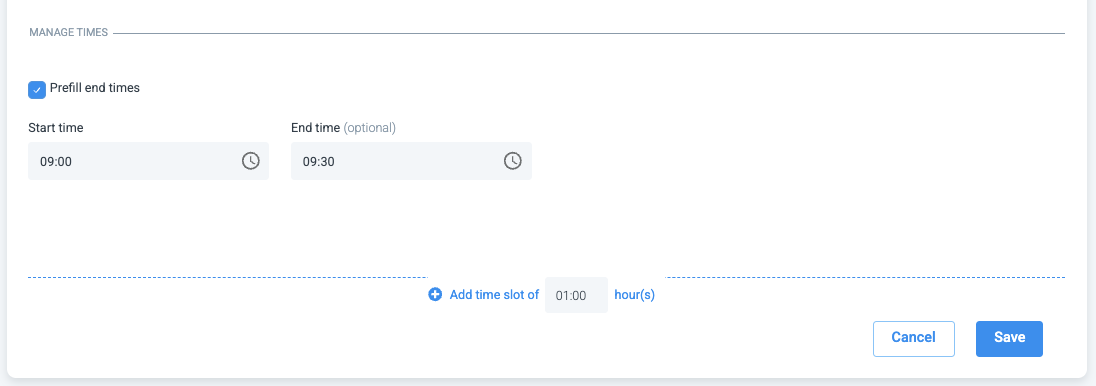
Continue adding your preferred time slots until your closing time.
10. All you have left to do is to hit Save! And your default time slot is almost ready to go.
To make sure your time slot is affecting all your product lists, you will need to enable time slots for your product lists.
To do so ....
11. Navigate to your products page.
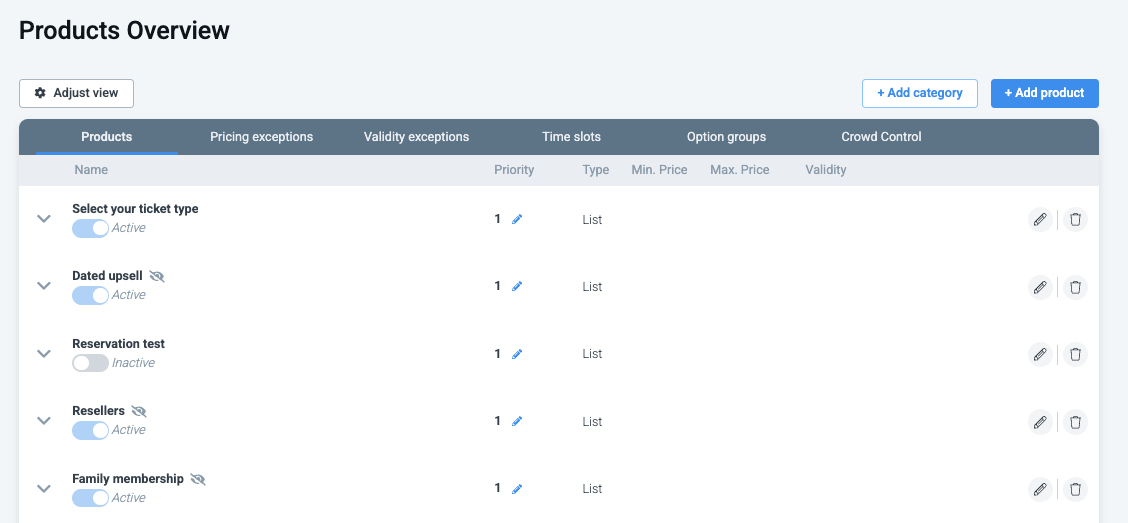
12. Click on your existing product lists to edit them.
13. Check whether you have Time slots enabled by moving the toggle to the right.
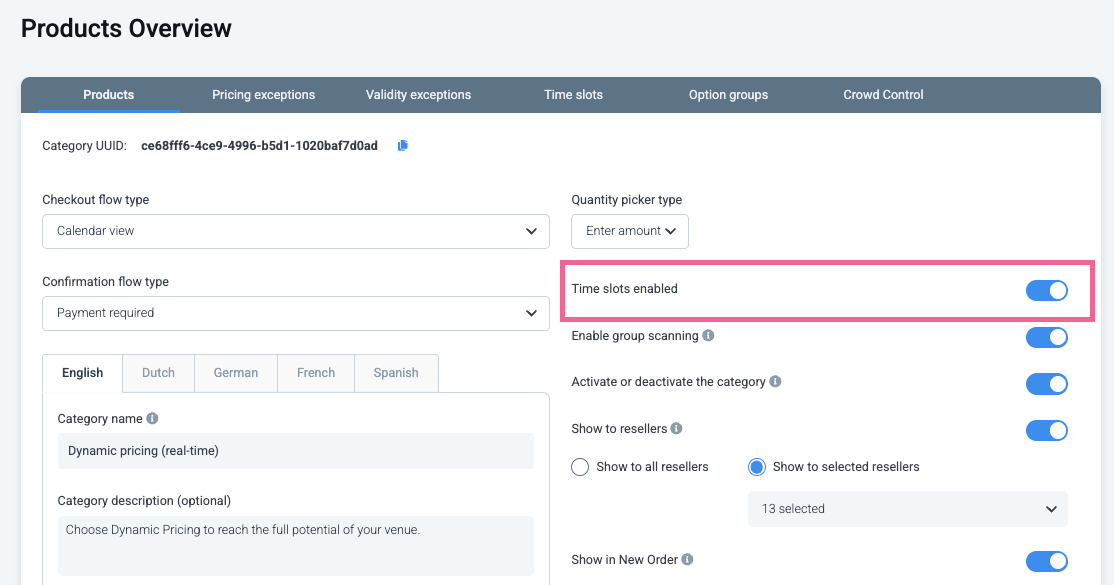
14. Make sure to save your changes.
Do this, with all your product lists, one after another, to ensure the default time slots will be connected.
🎉Done!
Overriding the default for exceptions within the same time frame
But what if you want to change the time slots for only a single day or several days?
For example, you want to set up shorter time slots of 30 minutes each for a special first of April attraction.
This is where priority comes in!
Here as well, please go through the process of adding a new time slot as shown above, but once you have set up the dates and it comes to setting priority, it is important your priority is higher than the one of your default time slot(s). In this case, the Time Slot Group, with the highest number will have the highest priority.
Add your desired time slots in the time management and hit save!
Setting up time slots for certain categories
Maybe you want to have special time slots for reservations or different time slots for season pass holders. You decide!
For this example, we will set up a specific time slot for the reservations.
To enable a specific time slot for reservations, you first need to check whether time slots are enabled within the according product list settings.
1. Navigate to your Products page.
2. Click on the product list you want to check.
3. Check whether you have Time slots enabled by moving the toggle to the right.
4. Make sure to save your changes.
Now, you need to set up the time slot for this category.
Here as well, please
1. Navigate to Products on your left-hand menu.
2. Choose Time Slots within the upper menu.
Here you will be able to see all your previously configured time slots. On one view, you can see which categories they are connected to, what priority they have, what their weekly pattern is, and to what date range they apply. We will explain each of these as we set up your time slot.
3. To add a new time slot, please click Add new.
4. First, you will need to choose a name for the Time slot. Choose something descriptive that is easy to understand. For this purpose, we will call it Reservation time slots March-April.
5. Then define a weekly pattern. By default, the entire week is selected. You can deselect the days by clicking on the icons.
Selected days, days the time slot applies to, are green and deselected days, days the time slot does not apply to, are red.
6. Select the category you want the time slot to belong and apply to. This can be one like it is in our example, or multiple categories.
7. Define the dates this time slot will apply to. Please note that the dates you choose effective from and effective to will be included, and thus, therefore, the time slot will apply to those days as well.
8. Now, you need to set a priority. This is particularly important in case this category belongs to the default time slot group, which it does (see set up above). Therefore, your priority needs to be a number higher than the priority of the default (set at 1).
9. Time to manage and set up the actual time slots.
9.1. Tick Prefill end times to make the set up quicker, easier, and less error prone. If you tick this box and add a starting time, the end time will be automatically set according to the duration you have set up at the bottom
9.2. Use the time slot duration to make adding a new time slot quicker and ensure the same time slot duration for all your time slots.
If you set up a one hour duration, once you add a new time slot, this will be adding one hour to the end time of the previous time slot:
Continue adding your preferred time slots until your closing time.
10. Have you double-checked everything? Then it is time to hit save!
Done!