Why is this important?
Setting up a correct pricing strategy can be a determining factor for the success of your leisure venue. Even though we do not recommend to set too many rules and exceptions for your pricing models, we know that sometimes it is a necessity.
The fewer rules and exceptions you apply to your pricing strategy, the better our Artificial Intelligence algorithm can work.
How to edit pricing settings
1. Sign in to your Convious Control Panel. Use your credentials to log in.
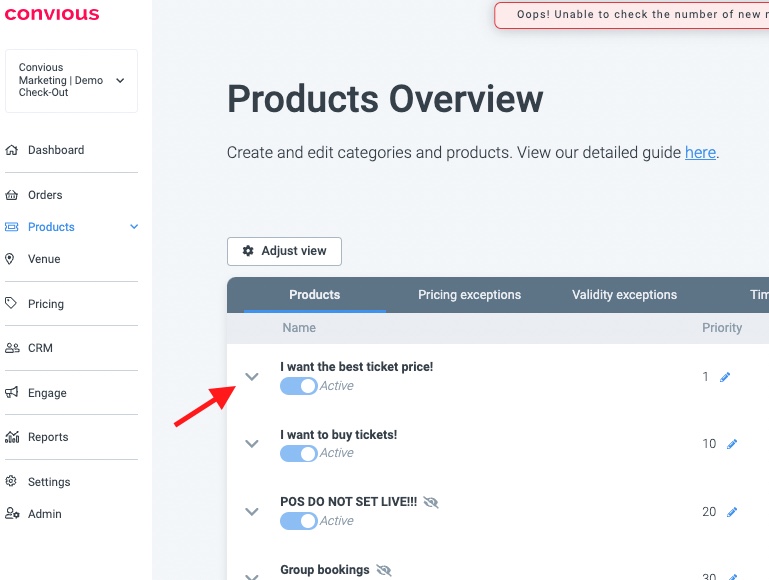
2. Find the 'Products' section in your left menu*
*You will need explicit permissions to access this area of the Control Panel. If you can't see 'Products' contact your account admin so they can grant you access.
- Click 'products' to get to your Products Overview screen.
Expanding the groups (when available)- Click the arrow before the categorie to expand and collapse the groups
- You will see the products that belong to that group
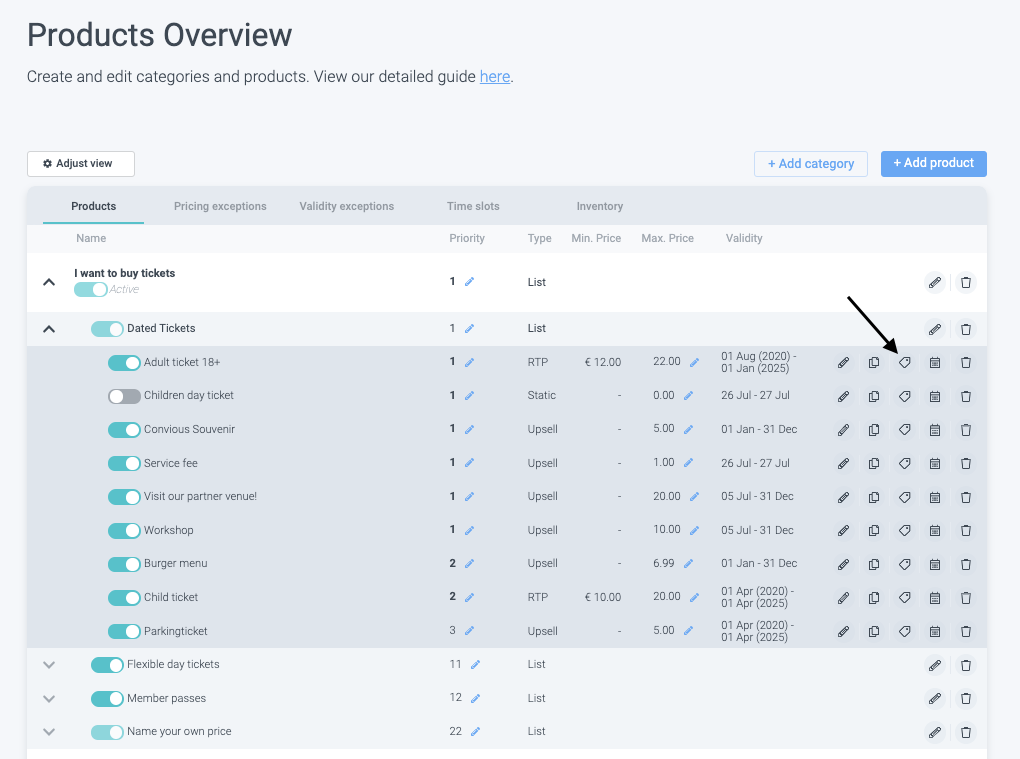
Each of your offered products will be listed per row, and their details will be displayed per column:
- Priority: Indicates the order in which those products will be shown on the check-out. - Use for the highest priority number 10. Then for the second, use 20 etc
- Type: Indicated the pricing type of your product. -
You checkout main articles will always be set up with RTP prices, also if there is no dynamic AI attached. This will mean that your set up of minimum, maximum and average target price will be the same.
[click here to learn more about each pricing type and its benefits].
- List: Of products
- RTP: Real-Time Pricing
- NYOP: Name Your Own Price
- Static: Fixed pricing
- Upsell: Complementary product
- Min. price: The lower price accepted for the product
- Max. Price: The maximum price accepted for the product
- Validity: The start and end date between which the product will be redeemable.
[Related article: How to manage and edit Validity Date Settings for your products.]
At the end of each row you will find five icons. The price-tag icon highlighted on the image below is the one you are looking for. Click on it to access the pricing settings for that product.
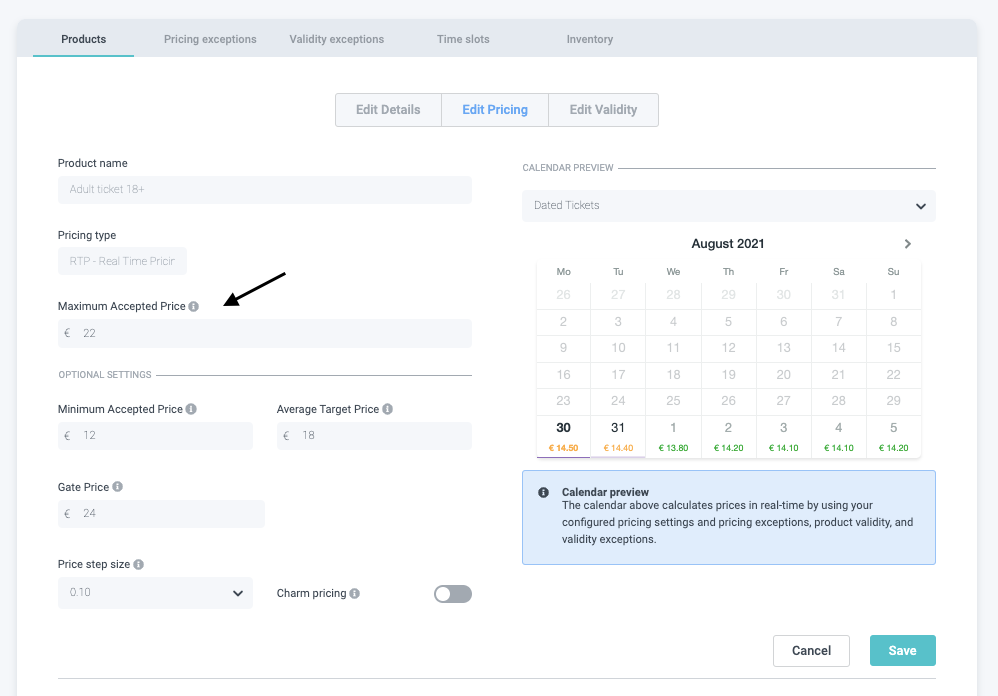
It will take you to the following screen shown in step 3.
3. Edit the global pricing settings
Different pricing strategies require different pricing settings. Use the links below to find information about the pricing type that you want to edit.
Editing settings depending on the pricing model
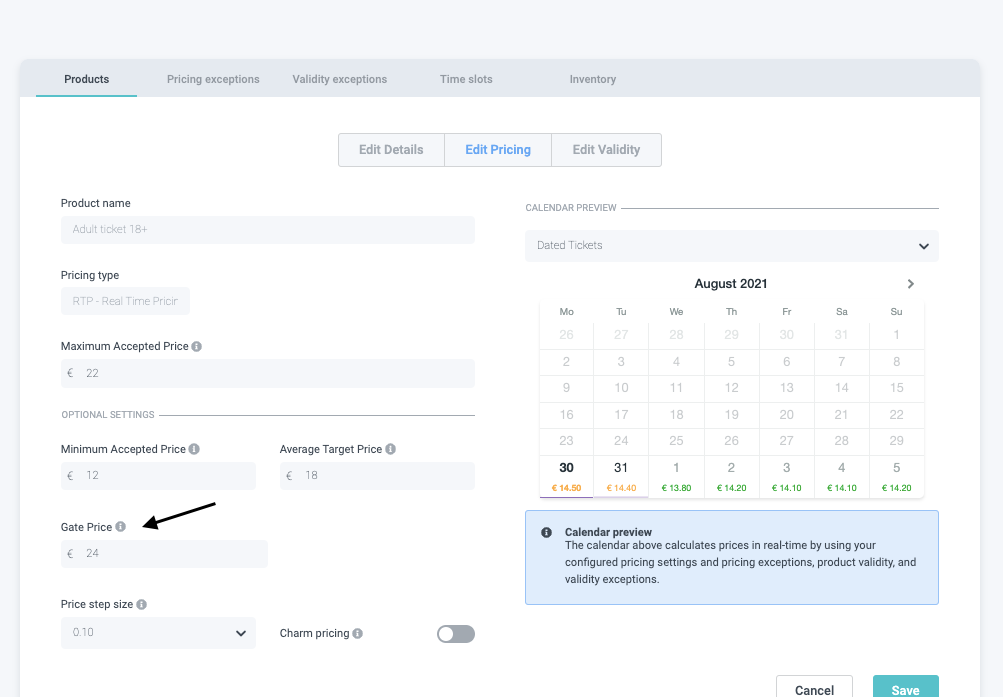
Editing Real-Time Pricing (RTP) products
Real-Time Pricing products have only one required pricing setting. All others are optional and will add constraints to the A.I-Driven algorithms to optimize your prices. Think about that before adding rules to your prices! No worries, we will help you to set them up and teach you are best practices.
- Maximum Accepted Price: Required. This is usually the gate price, but sometimes is the maximum price that you want to charge your visitors in an online shop.
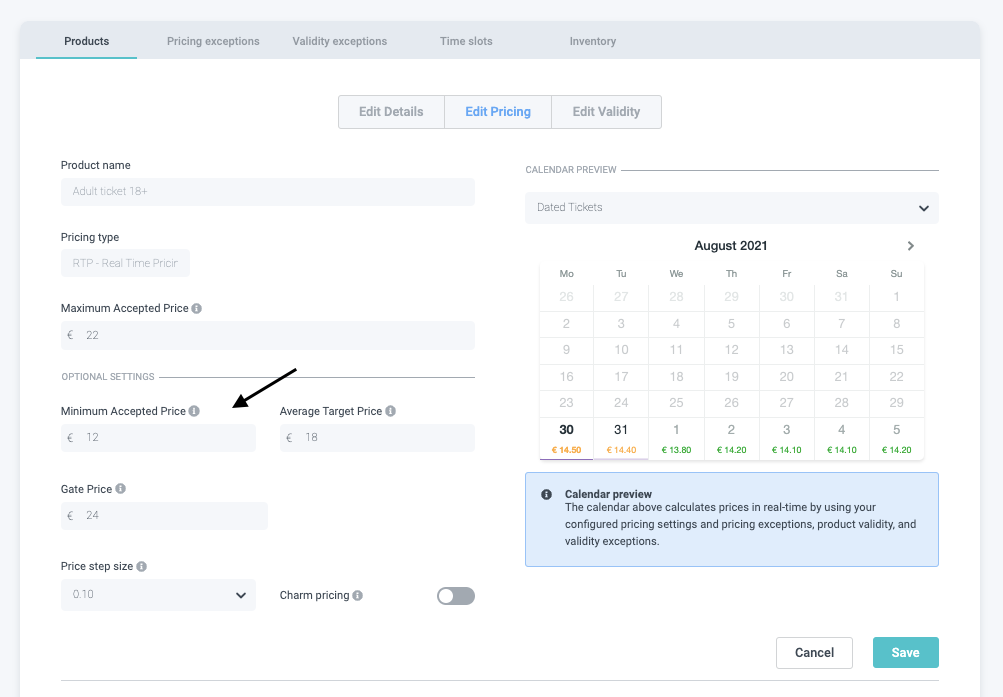
- Minimum Accepted Price: Optional. This is the minimum price that you will accept for your product. If you leave it blank, Convious will NEVER sell it for less than 50% of the Maximum Accepted Price.
- Average Target Price: Optional. This is a constraint to the system. You should leave it blank to give algorithms more freedom to work, but if you decide to add this information the system will maintain the average target price for that product counting the last 20 transactions.
- Gate Price: Optional. This field does not affect your price strategy. It's used in some cases to be displayed as the stroked 'original price' when online and offline prices are different (Ex. Gate price is €20, but online price is €18).
- It is also important to set it up if you are using a POS integration partner via our pricing API. In this case all onsite sales will have the possibility to sell at gate price or even have it dynamic like the online prices. We will advice you always to use gate price for your POS API.
- Step Size & Charm Pricing:
Now you can also use different tactics to round your prices to create coherence among your prices, avoid odd-looking prices and use the whole price perception to your advantage.
With the Price step size, you can select the steps used to round your prices.
With a step size of 0.01, there will be no rounding.For example, a step size of 0.05 cents allows you to round 11.82 to 11.80, 11.84 to 11.85 or 11.97 to 12.00. Thus, prices are rounded to the nearest 5 cents.
A step size of 0.10 prices are rounded to the nearest 10 cent value. 11.94 will be 11.90, and 11.96 will be 12.00.
With a step size of 0.50 prices will be rounded to the nearest 50 cent value, and with the last step of 1.00 the prices will be rounded to the nearest 1 Euro (or other currencies) value.
This allows unifying prices and increasing their appeal.
On the other hand, even if you decide to round prices, charm pricing can help you make use of a psychological tactic making your prices even more appealing.With charm pricing, prices are reduced from a round number by one cent, leaving them to be perceived much differently. For example, a price of 20.00 would be turned into 19.99. This pricing strategy demonstrates perceived value focusing on the lower number, which would be 19 instead of the 20, which is perceived much more convincing.
Step sizes and charm pricing can be used independently but also work well together.
For example, rounding a price of 19.96 to 20.00 with rounding steps and turning it into 19.99 with charm pricing.
When you are done adding your pricing settings hit Save and you are done!
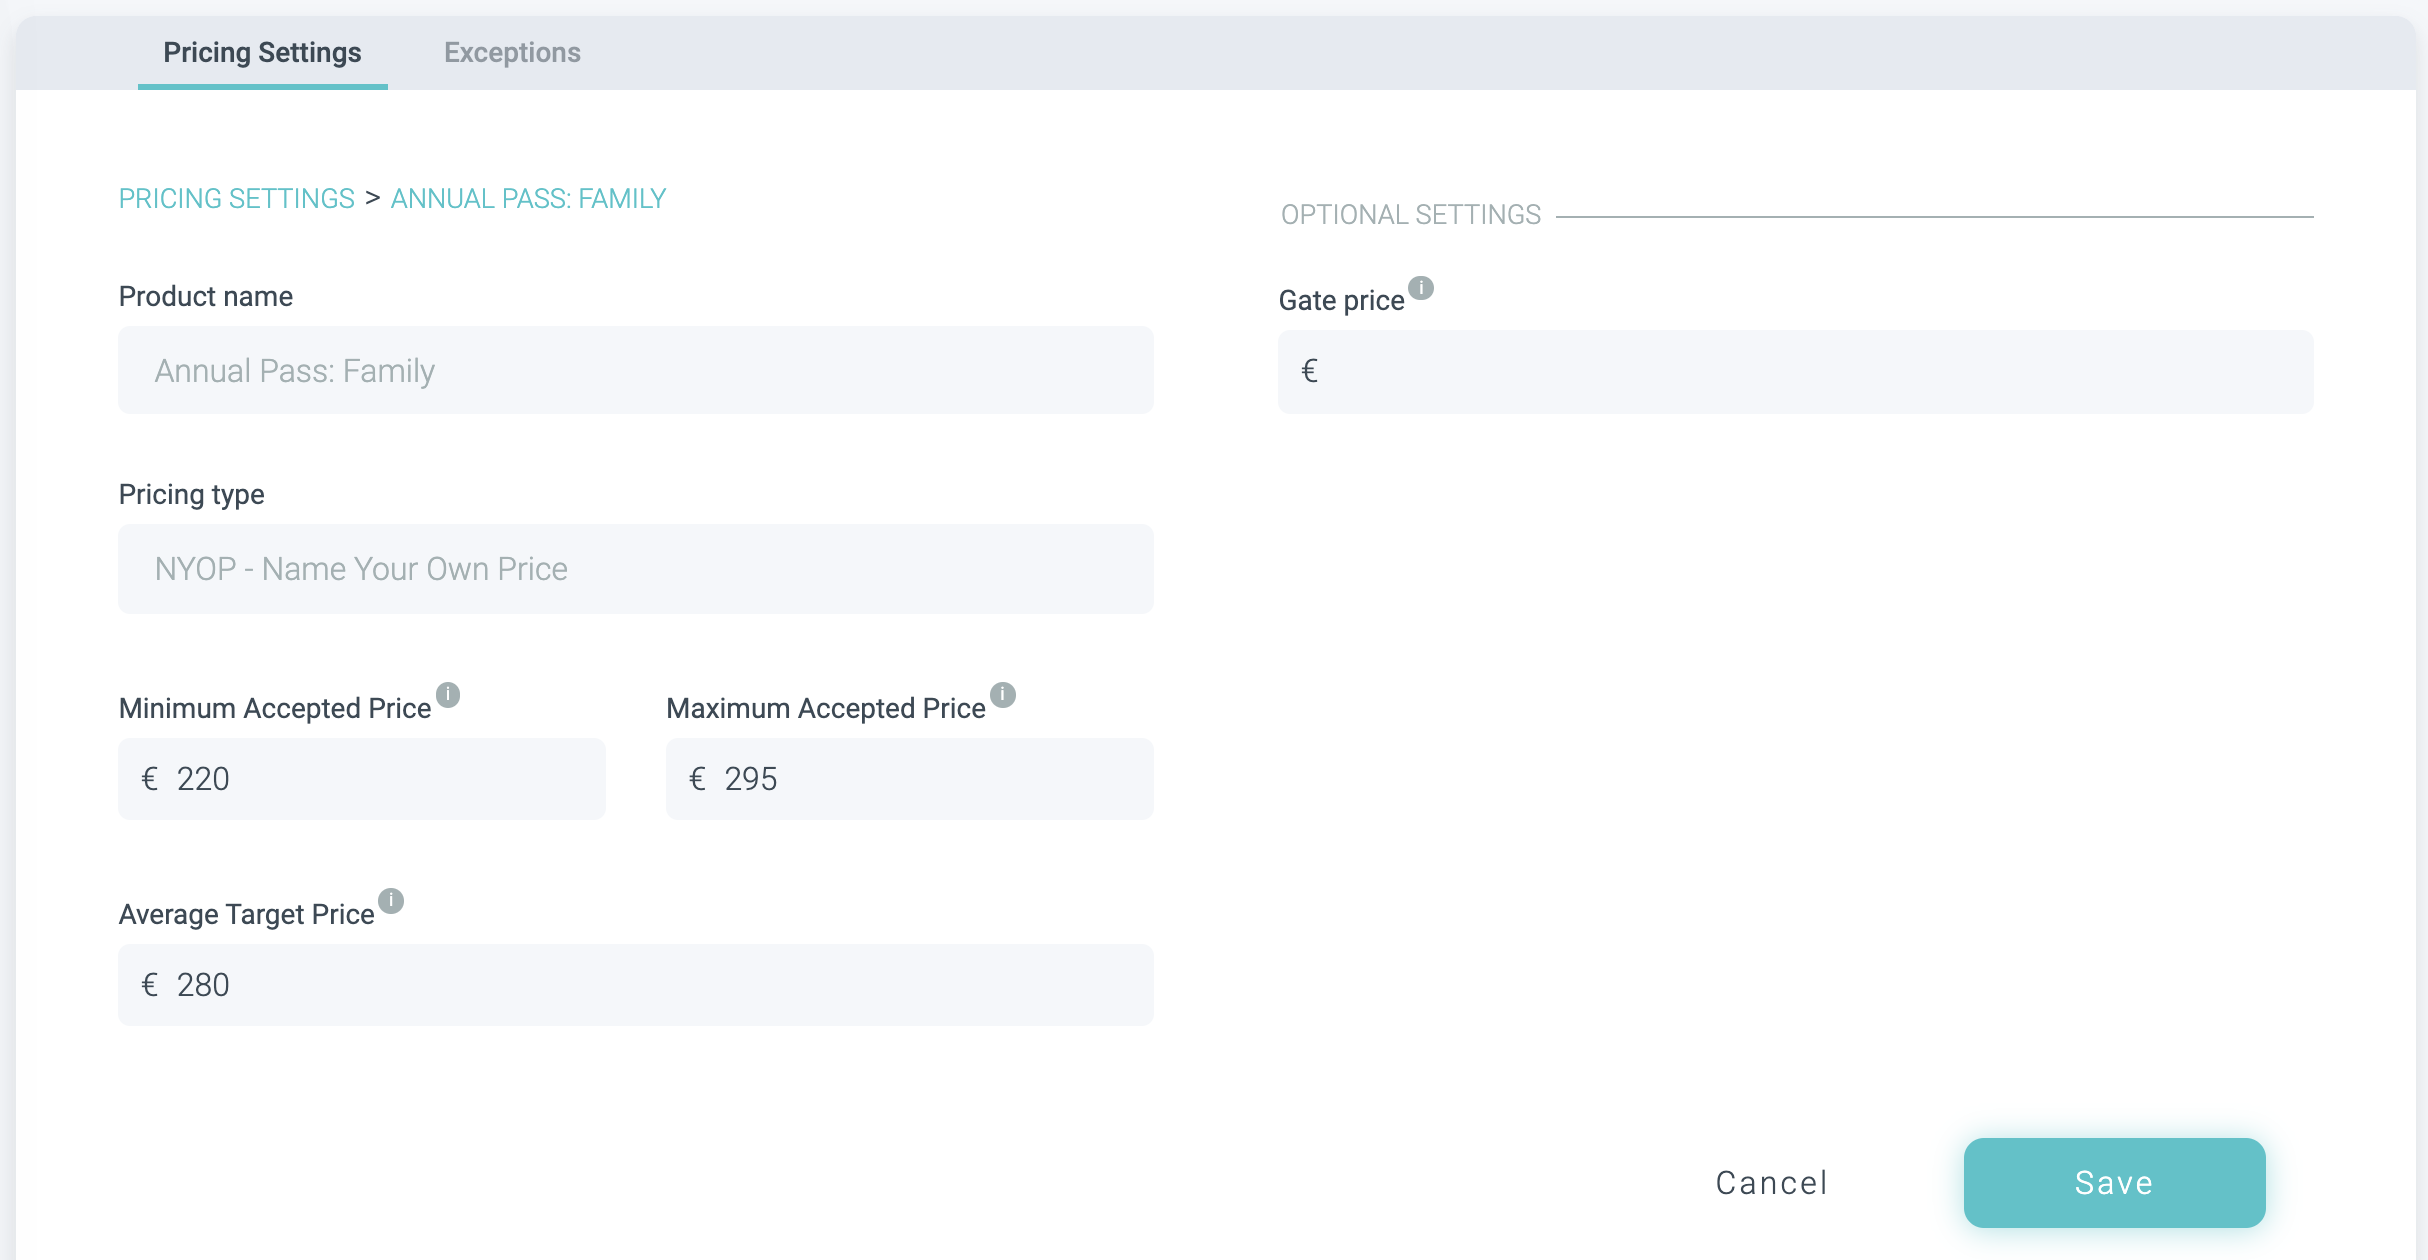
Editing Name Your Own Price (NYOP) products
Name Your Own Price products have three required pricing settings. The only optional is Gate Price and it will not add any constraints to the A.I-Driven algorithms that optimize your prices.
- Maximum Accepted Price: Required. This is usually the gate price, but sometimes is the maximum price that you want to charge your visitors in an online shop. With 'Minimum Accepted Price' this field defines the range where the algorithms will operate.
- Minimum Accepted Price: Required. This is the minimum price that you will accept for your product. Together with 'Maximum Accepted Price' this field defines the range where the algorithms will operate.
- Average Target Price: Required. This is your desired target price for the product and is very important for pricing optimization.
- Gate Price: Optional. This field does not affect your price strategy. It's used in some cases to be displayed as the stroked 'original price' when online and offline prices are different (Ex. Gate price is €20, but online price is €18).
Again, once you are done adding your pricing settings don't forget to hit Save.
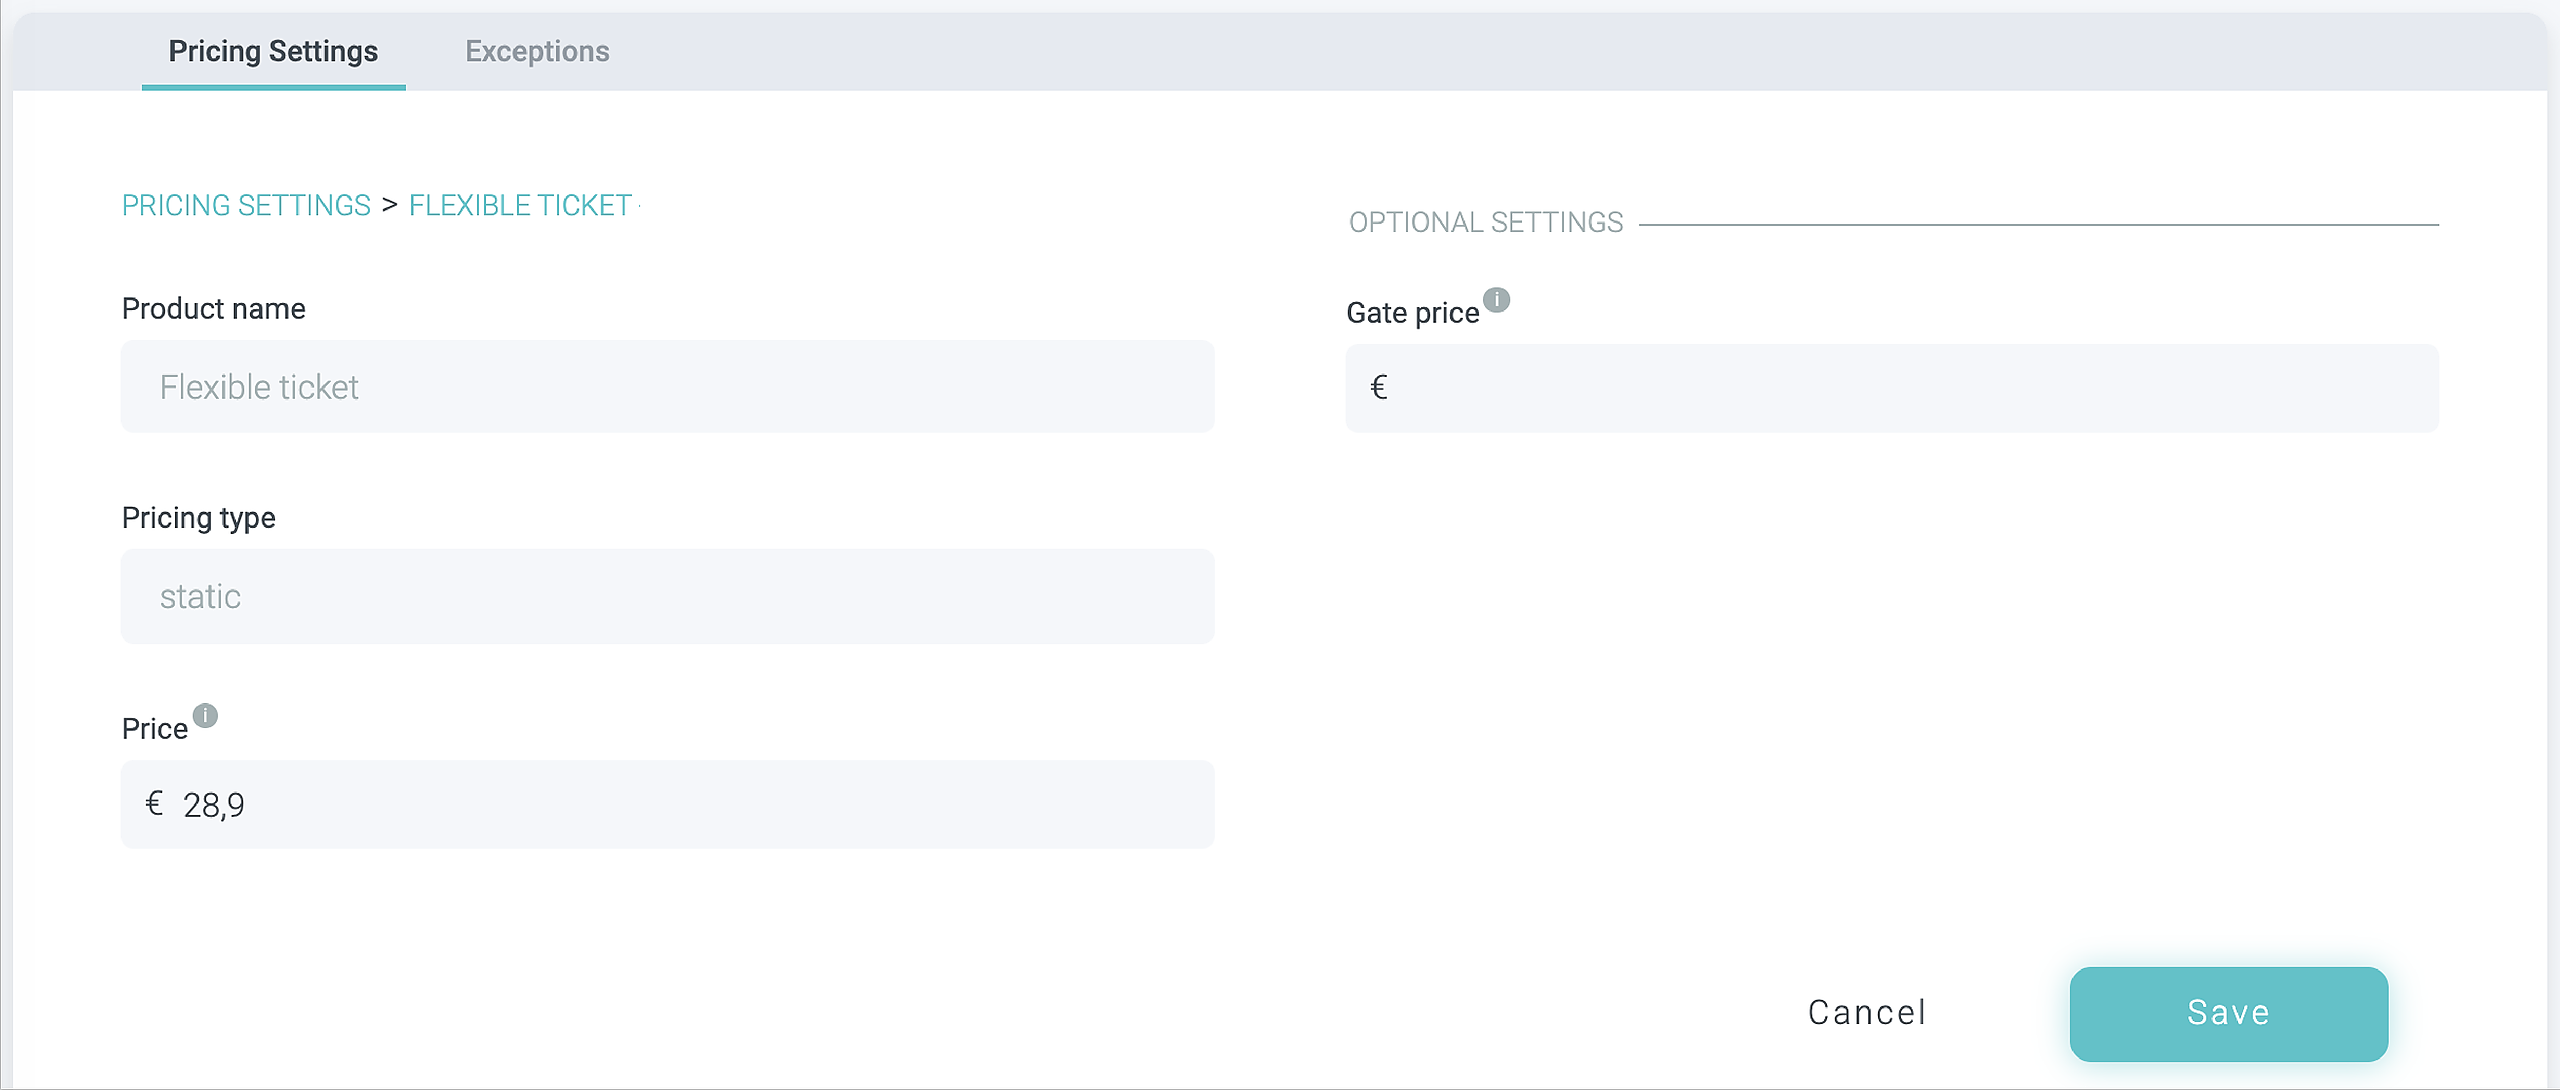
Editing Static Priced products
Static (or fixed) priced products have one required and one optional field. These prices are not automated by any algorithms and will only follow your rules.
- Price: Required. This is the price of your product.
- Gate Price: Optional. This price is used in some cases to be displayed as the stroked 'original price' when online and offline prices are different (Ex. Gate price is €20, but online price is €18). To increase your online sales this tactic is very efficient!!!
When you are done adding your pricing settings hit Save and you are done!
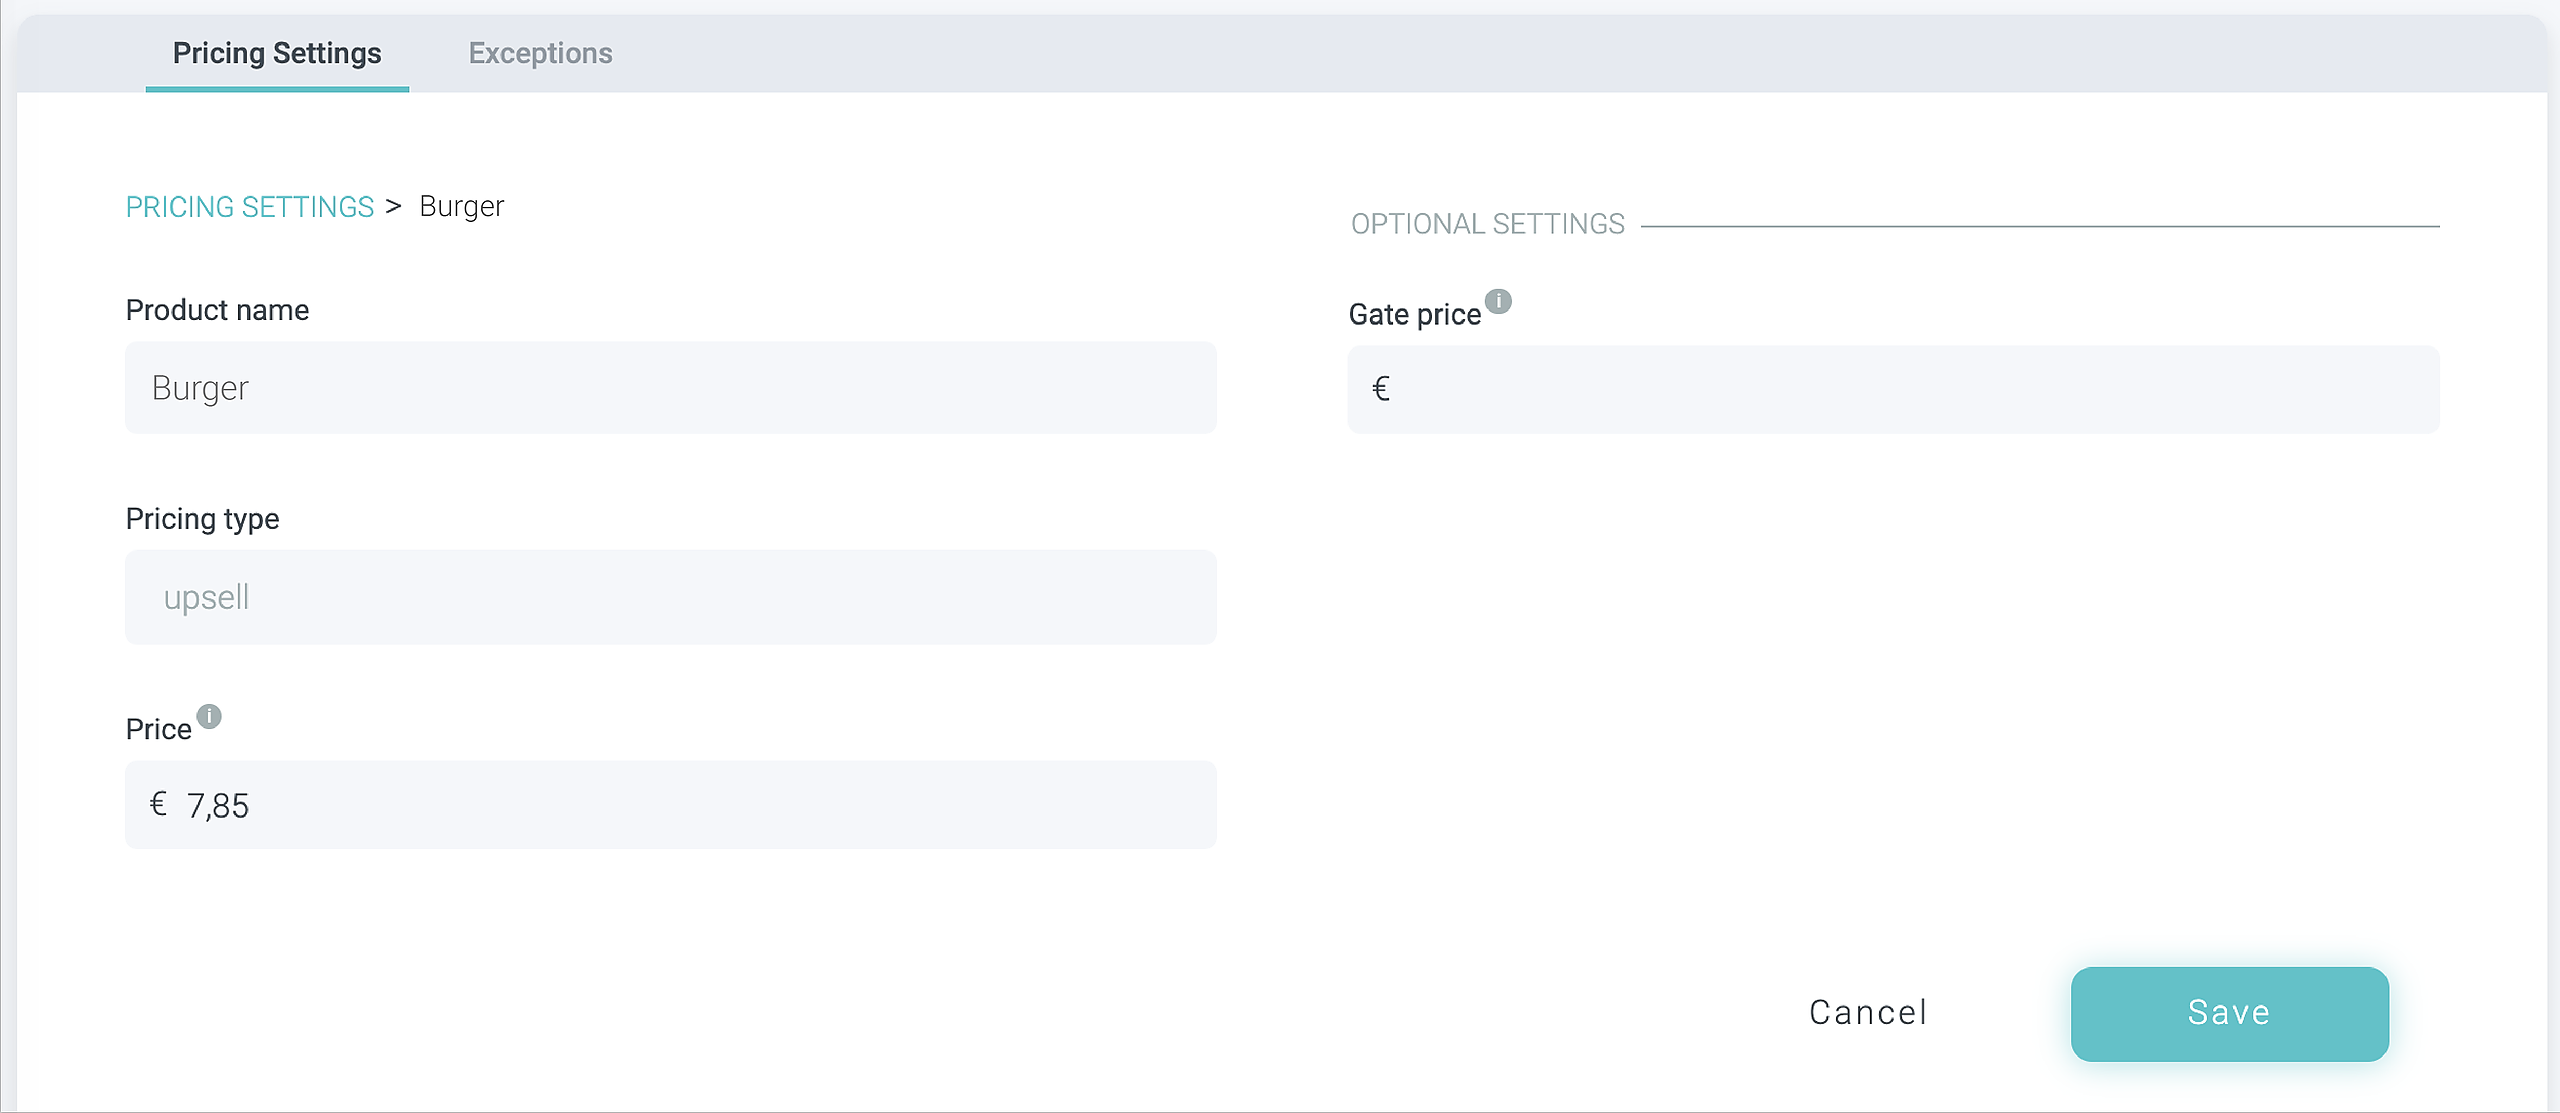
Editing Upsell products
Upsell products work the same way that static products do: They also have one required and one optional field and they are not automated by any algorithms so they will follow your rules.
- Price: Required. This is the price of your upsell.
- Gate Price: Optional. This price is used in some cases to be displayed as the stroked 'original price' when online and offline prices are different (Ex. Gate upsell price is €20, but online upsell price is €18).
Once you are finished introducing your price input, simply remember to hit 'Save' and you are done!
These pricing settings establish global pricing rules. Nevertheless, you might also have the need to add exception rules that will override them. For example, if you want to increase your general price by 4€ on the weekends. So simply said, exceptions are rules that modify global pricing settings, and you can also add them directly from your Convious Control Panel.
If you are interested in learning how to set up pricing exceptions, read this article.
Time to practice
Let’s put all this knowledge to practice!
- Change the minimum accepted price of one of your products
- Change the Gate Price of one of your products
- Depending on the pricing model chosen ( Real-Time Pricing, NYOP, Static Price, Upsell item prices), change the pricing settings.
Check yourself
- Do you know why it is not recommended to set too many rules and exceptions for your pricing models?
- Do you know how to change the main settings of your product's prices?
- Do you know what you can edit depending on different pricing models?
If you answered “yes”, congratulations! You are on your way towards mastering your Convious Control Panel


